Transferring photos from your iPhone to a computer is a fairly straightforward process, regardless of the operating system (OS).
Whether you are backing up priceless memories or freeing up storage on your mobile device, we can help. This guide details methods for both Windows and macOS. So you can quickly and safely move photos from an iPhone to your computer.
What To Know:
How To Transfer Photos From iPhone to PC
Millions of people use an iPhone and a Windows PC as their daily devices. This split ecosystem is easier than ever to manage in 2026, given Apple’s cross-platform tools and Microsoft’s acceptance of iPhones.
These methods allow users to seamlessly transfer photos from their iPhone to a computer running Windows 11 or Windows 10.
Best For: People with large photo libraries and users who do not want to download additional software.
The fastest way to send your photos from an iPhone to a PC involves a USB cable and File Explorer.
Editor’s Note: If iCloud Photos has Optimize iPhone Storage enabled, you will need to download the original file on your device. Otherwise, the iPhone will transfer photos with lower resolution. To ensure full resolution, go to Settings → Your Apple ID → iCloud → Photos → Download and Keep Originals.
To transfer photos using File Explorer:
- Connect your iPhone to the PC with a USB cable.
- Enter your passcode to unlock the iPhone.
- Tap Trust on the iPhone when prompted.
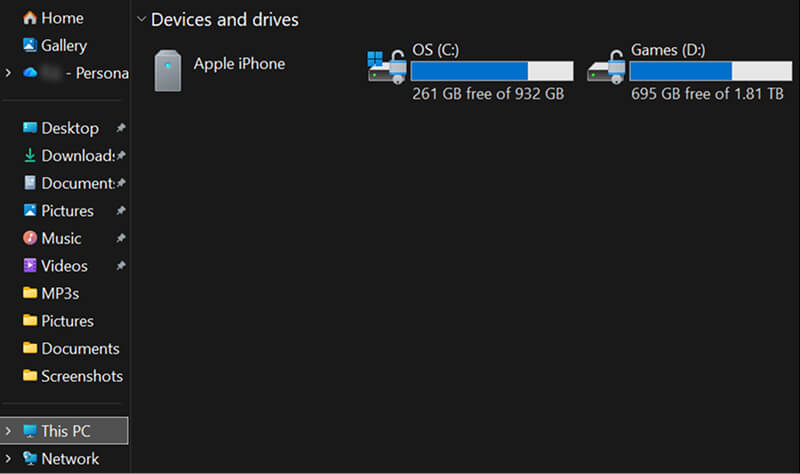
- Open File Explorer by clicking the folder icon on the taskbar.
- Locate your connected Apple iPhone under This PC.
- Navigate to Internal Storage and DCIM.
- Copy and paste or drag and drop the photos into any folder on the computer.
These actions duplicate photos on your PC and keep them on your mobile device. Cut the image from the iPhone’s DCIM folder and paste it on the PC to move the photo’s location.
Having the Optimize iPhone Storage option enabled could prevent the DCIM folder from loading. Storing thousands of photos on the iPhone can
Editor’s Note: Don’t see your iPhone in File Explorer? Make sure you use a USB data cable for the file transfer, not a charging cable. If the iPhone is still not visible, remove the Apple Mobile Device USB Driver from Device Manager, then reinstall it. An iPhone that remains undetected after these steps and shows several signs of failure might need iPhone data recovery. Contact us for free diagnostics and quotes.
Best For: Wireless file transfers on Windows and keeping photos synced across multiple devices.
iCloud is Apple’s popular synchronization service. The cloud platform has an app on the Microsoft Store, giving iPhone owners another option for saving photos on their PC. You may need to subscribe to iCloud+ because the free tier is capped at 5 GB.
To transfer photos using iCloud for Windows:
- Go to Settings, tap your Apple ID, choose iCloud, select Photos, and then enable the Sync this iPhone option.
- Download iCloud for Windows on your PC.
- Sign in to the app with your Apple ID.
- Open iCloud for Windows and choose your sync settings to set up the app.
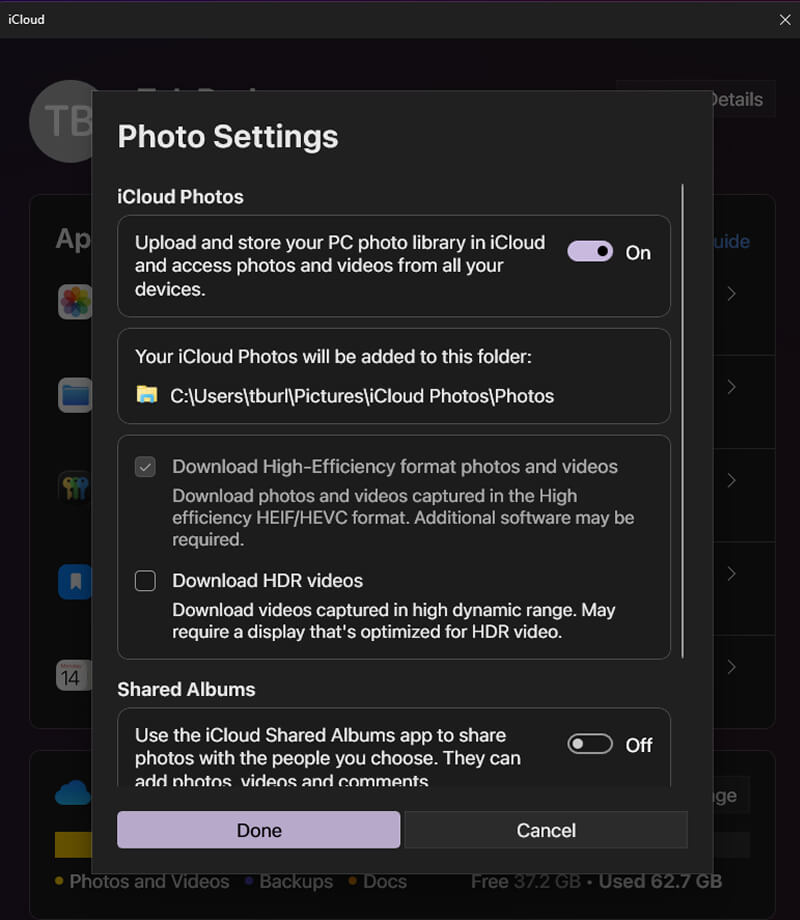
- Toggle iCloud Photos On in the app and click Done.
- Your iPhone’s images will appear in the iCloud Photos folder in File Explorer.
Importing photos into Windows with iCloud bypasses the device and sidesteps all resolution issues.
Best For: Creating a full backup for your iPhone on a PC.
The Apple Devices app functions as a backup program rather than a sync service like iCloud. iTunes has a similar approach on older systems, such as computers running Windows 7.
To back up photos using the Apple Devices app:
- Download the Apple Devices app on the Microsoft Store.
- Connect your iPhone to the computer via USB cable.
- Open the Apple Devices app.
- Unlock the iPhone by entering your passcode.
- Click Trust in the app on the PC and then tap Trust on the iPhone.
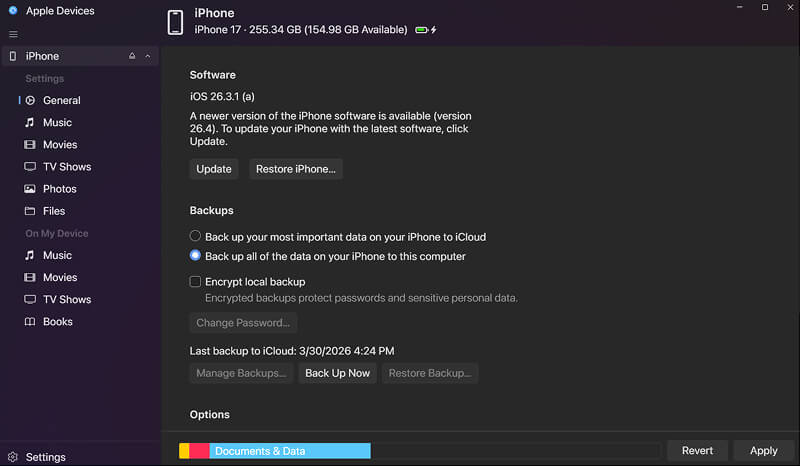
- Click General in the left sidebar.
- Select Back up all of the data on your iPhone to this computer.
- Click Back Up Now.
Wait for the process to finish, displayed by the progress bar at the bottom of the screen.
Editor’s Note: You will need to disable iCloud Photos if you only want to transfer specific images to the PC. Losing access to iCloud after disabling iCloud Photos could lead to permanent data loss. Also, if your iPhone’s storage was optimized, the device does not contain the original photos at full resolution.
How To Transfer Photos From iPhone to Mac
Apple thoughtfully built its ecosystem for total integration between its devices. As a result, transferring photos to your Mac is often a painless experience.
Best For: Users who want to select photos to store on their Mac and organize them as they do on their iPhone.
You can quickly import your favorite images on the iPhone using the Photos app on macOS.
To transfer photos using the Photos app on Mac:
- Connect your iPhone to the Mac with a USB data cable.
- Enter the passcode to unlock your iPhone.
- Open the Photos app on your Mac.
- Select your iPhone from the left sidebar if the import screen does not appear.

- Choose the photos you want or click Import All New Photos.
- Select a destination album or let the iPhone organize the photos.
This design gives users complete control over what photos are saved on their Mac’s storage.
Best For: Transferring a small batch of photos without a cable.
Apple’s AirDrop technology is the fastest wireless way to share photos between an iPhone and a Mac. It does not even require you to download an app.
To transfer photos using AirDrop:

- Open the Finder app on your Mac.
- Click AirDrop in the left sidebar.
- Open the Photos app on your iPhone.
- Tap the Share icon in the bottom-left corner of the iPhone.
- Select AirDrop, typically in the second row of the Share Sheet.
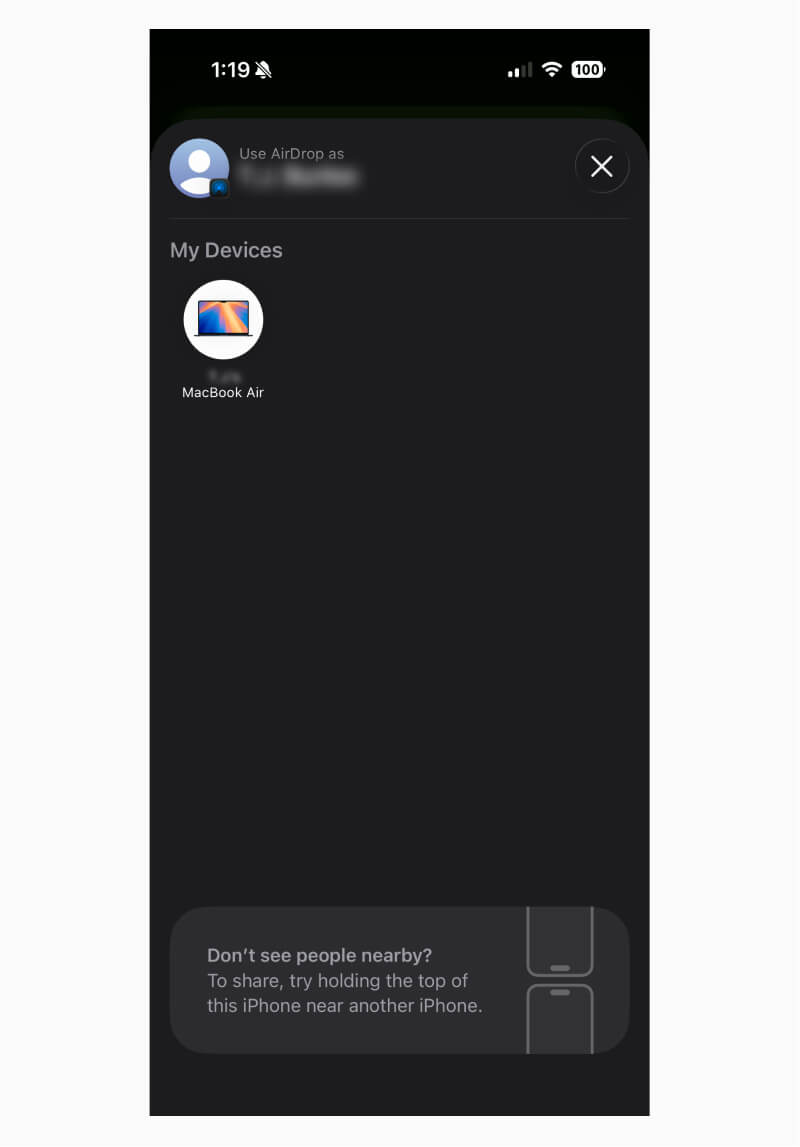
- Tap your Mac in the device list.
AirDrop will send the photo to the Downloads folder on your Mac.
Best For: Automatic syncing across all Apple devices.
iCloud Photos syncs all of your iPhone’s images to your Mac in the background. No manual transfers are needed.
To transfer photos using iCloud Photos:
- Open the phone’s Settings app, tap your Apple ID, select iCloud, press Photos, and turn on Sync this iPhone.
- Open the Photos app on your Mac.

- Click Photos in the menu bar, then Settings.
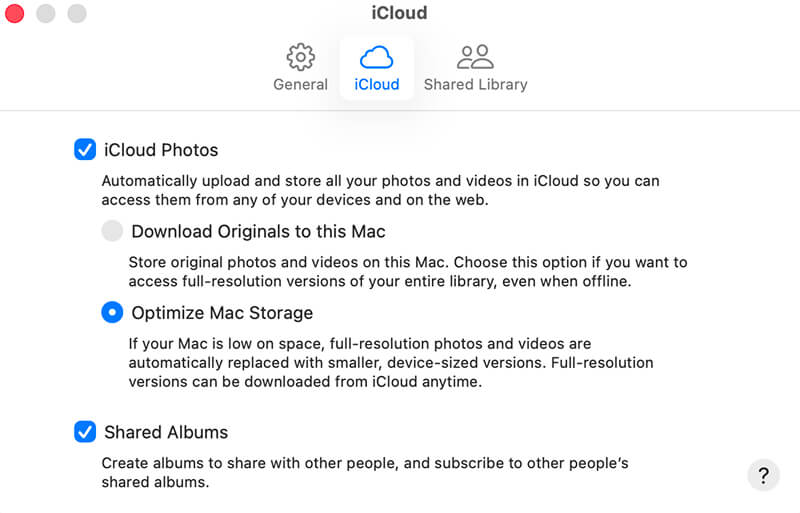
- Click the iCloud tab.
- Check the box next to iCloud Photos.
The photos will sync over Wi-Fi, allowing you to access the iPhone’s images on your Mac.
Editor’s Note: The free iCloud plan includes 5 GB of storage space. You might need to subscribe to iCloud+ for maximum benefit.
Best For: People who want a full backup of their iPhone.
Because iCloud is a sync service, it can make sense to transfer photos using Finder as well. Deleting an image on a device will also erase it from the other device when iCloud Photos is enabled. Finder stores photos regardless of their status on either device.
To back up photos using Finder:
- Connect the iPhone to your Mac via a supported USB cable.
- Click Allow when prompted.
- Unlock your iPhone, tap Trust on the device, and enter the passcode again.
- Open the Finder app on your Mac.
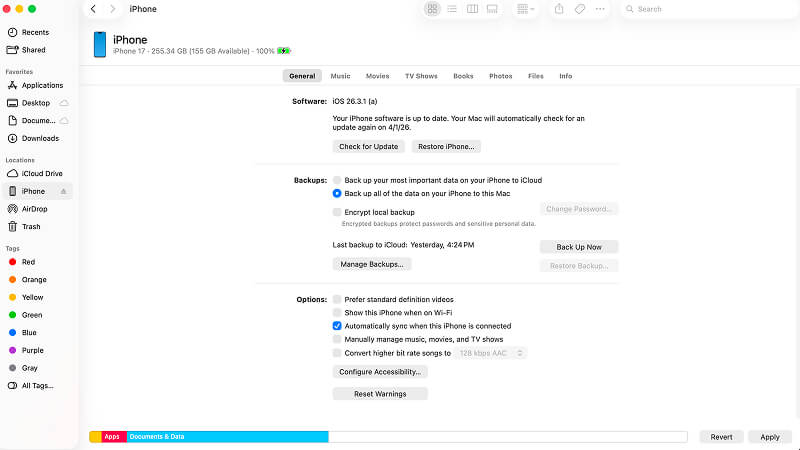
- Click your iPhone in the left sidebar.
- Select Back up all of the data on your iPhone to this Mac.
- Click Back Up Now.
The backup process should take between 30 minutes and 2 hours.
Editor’s Note: If iCloud Photos is not enabled, then users have the option to duplicate specific photos in Finder. After clicking your iPhone, go to the Photos tab and drag preferred images to your Mac.
When Photo Transfers Fail: iPhone Data Recovery Options
In the vast majority of cases, transferring photos on an iPhone is a quick, hassle-free process. Rarely, your computer does not recognize the iPhone. It is also possible your photos are missing, or they won’t open after the file transfer.
The phone data recovery experts at Secure Data Recovery can help in these situations. Our engineers routinely address hardware failure and software errors to retrieve photos from an Apple device. We are an Apple Authorized Service Provider (AASP) with free diagnostics and a No Data, No Recovery Fee guarantee.
Call 800-388-1266 or fill out our form to request a free quote to reclaim what matters most on your iPhone.
Frequently Asked Questions About iPhone Photo Transfers
What is the fastest way to transfer photos from an iPhone to PC?
What is the easiest way to transfer photos from an iPhone to a computer?
How do I transfer all my photos off my iPhone?
Why can’t I transfer my iPhone photos to a computer?
It depends. You might need to trust the computer to begin the transfer. A simple connection issue could prevent file transfers, so try a different cable or USB port. Windows might not recognize the file format, requiring conversion to a different extension. Sometimes, the computer cannot communicate with the device, such as when iPhone Error 4013 triggers. An iPhone that is already failing due to physical damage or file corruption may struggle to maintain a connection.
Troubleshoot issues step by step to determine the cause and find a solution.

Timothy Burlee

Timothy Burlee is a content writer for Secure Data Recovery Services. He specializes in various topics in the data industry, including data recovery technology, storage devices, and digital forensics. Throughout his career, he has covered complex concepts and provided accessible solutions for users. Before joining Secure Data, he worked as a freelance technical writer.