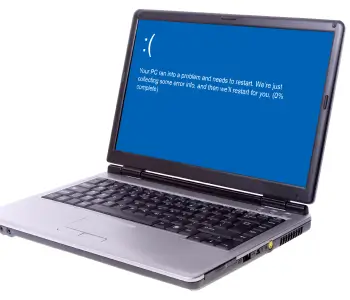
If your PC gets stuck on the “Preparing Automatic Repair” screen, your data is usually safe. You can often fix the issue without reinstalling Windows or replacing your drive.
This screen appears when Windows encounters a problem it cannot resolve during startup. Fixes range from a quick restart to rebuilding boot files and removing recently installed software.
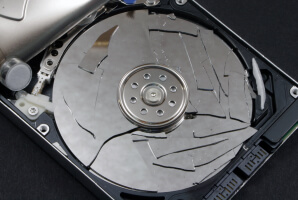
If none of the software solutions work, it indicates a hardware failure.
What To Know:
- “Preparing Automatic Repair” is a diagnostic tool that attempts to correct boot errors on Windows. It does not automatically delete data on your hard disk drive (HDD) or solid-state drive (SSD).
- If the screen cycles without loading Windows, then your boot files are likely corrupt or missing. There are a couple of ways to repair this data.
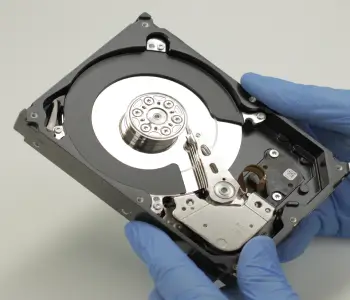
- You can request help from data recovery experts if you are concerned about critical files on the drive.
Why Does My Computer Keep Saying “Preparing Automatic Repair”?
A PC preparing to run automatic repair tools means your system experienced an error that prevented it from loading Windows.
The most common reasons for a computer getting stuck on the “Preparing Automatic Repair” screen include:
- Corrupted boot files from a sudden power loss or malware.
- Failed Windows Update modifies system files.
- Bad drivers conflict with the startup process.
- Misconfigured BIOS settings or Windows Registry entries.
- The storage device suffers damage in sectors with boot data.
- Loose cables cause an intermittent connection.
- New memory modules trigger read errors during startup
Windows is usually not beyond repair, and Automatic Repair will not erase your files. The utility keeps running if it can’t find or fix the problem.
The steps below are often necessary to address an Automatic Repair boot loop on a Windows PC.
What To Do When “Preparing Automatic Repair” Is Stuck on PC
The following methods are listed from simplest to most involved fixes. Work through them in order. Each step rules out a potential cause and informs the next actions.
Most cases resolve by Method 4. Troubleshooting should take only a short time for many users.
Method 1: Force Restart Your PC
Editor’s Note: An abrupt shutdown while Windows is still running can cause file corruption. Contact data recovery services if you cannot risk losing files on the affected drive. We offer free diagnostics and quotes as part of our standard service.
Unexpected shutdowns or software glitches can trigger Automatic Repair on startup. The process usually takes 15 to 30 minutes on newer PCs with SSDs. PCs with hard drives may take hours, depending on the issue.
You may see signs of freezing, like a stopped progress circle.
Wait an hour to see if Windows is stuck. If so, restart to clear a temporary glitch, or proceed to other solutions.
To perform a force restart:
- Press and hold the Power button for 10 seconds.
- Wait 30 seconds.
- Disconnect all peripheral devices, such as USB hubs, external drives, and printers, from the PC while waiting.
- Press the Power button to reboot the computer.
If the Automatic Repair screen appears and freezes again, then repeat these steps twice more.
Your system should enter the Windows Recovery Environment (WinRE) for more advanced repairs.
Editor’s Note: If a WinRE instance fails to launch, then a damaged or defective drive is much more likely.
Method 2: Run Startup Repair From Advanced Options
WinRE provides users with tools to solve a persistent boot loop after several failed attempts.
Startup Repair in WinRE scans for issues that interrupt Windows while loading.
To run Startup Repair in WinRE:
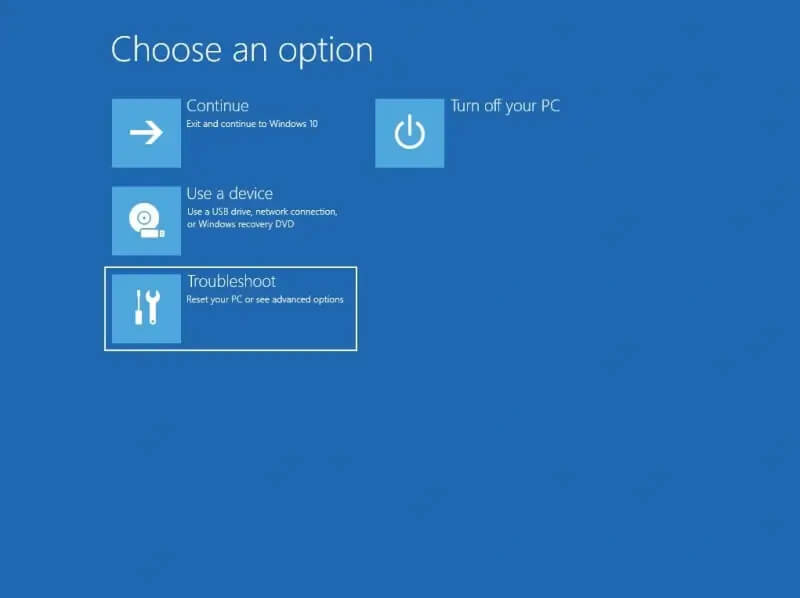
- Click Troubleshoot.
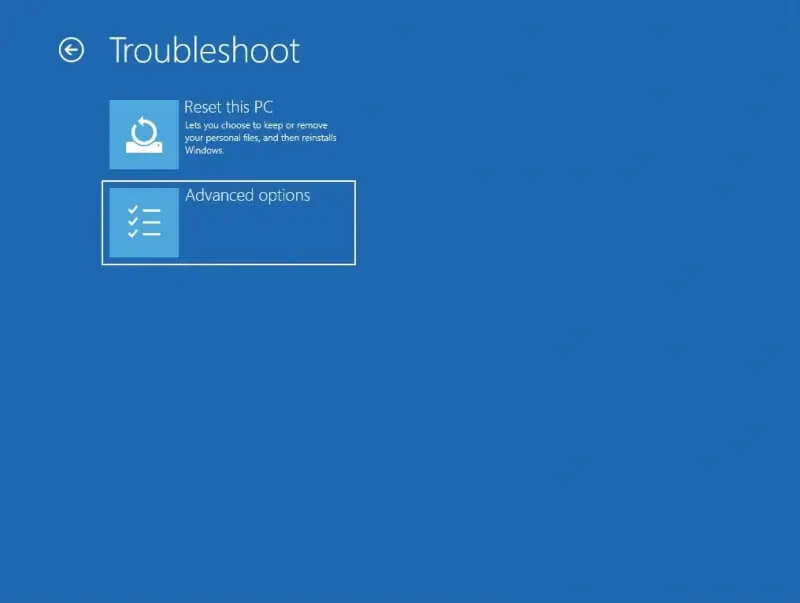
- Select Advanced options.
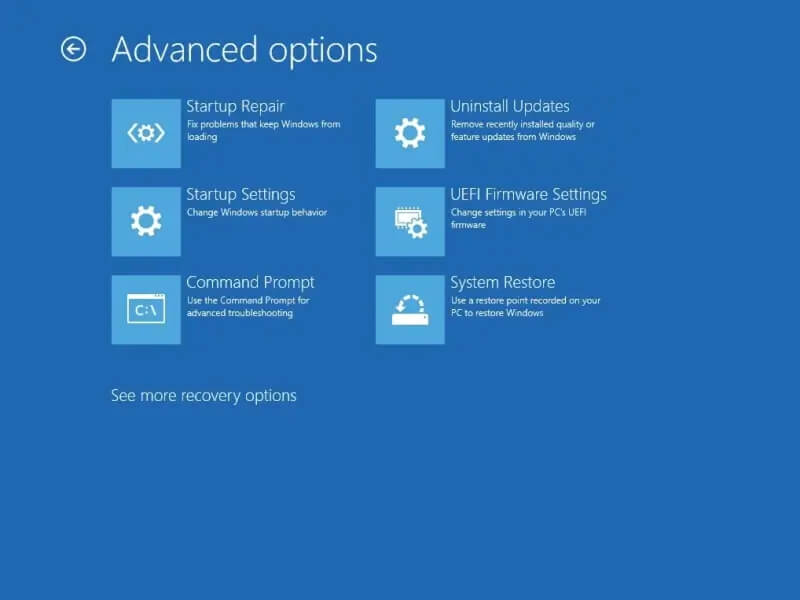
- Click Startup Repair or Quick machine recovery.
- Enter your BitLocker recovery key if prompted.
- Choose Windows 11 or Windows 10 for the target operating system, matching your current installation.
- Wait for Startup Repair to diagnose and potentially fix your PC.
Editor’s Note: Quick Machine Recovery (QMR) is an upgraded Startup Repair, released for Windows 11 24H2 build 26100.4700 or later. It connects to the cloud and scans for fixes to a wider array of boot issues. If QMR is not available or disabled, the system runs Startup Repair locally.
If Startup Repair works, Windows will boot normally. Otherwise, you’ll see a message that it couldn’t repair your PC.
Click the advanced options button to return to WinRE and proceed to the next step.
Method 3: Use System Restore To Roll Back Windows
System Restore is a useful feature that can revert Windows to a prior point where it was functional.
However, you must set up System Restore before problems occur.
Editor’s Note: Using System Restore can lead to incremental data loss. Any changes made to stored data since the restore point will be lost unless saved elsewhere.
To roll back Windows to a previous point:
- Choose the Troubleshoot option in WinRE.
- Click Advanced options.
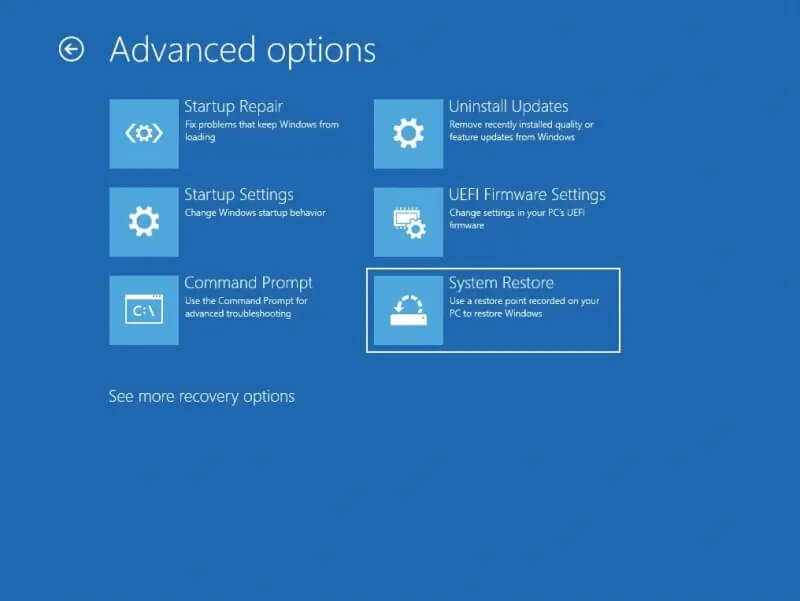
- Choose System Restore from the menu.
- Select the desired restore point from the list of results.
- Click Next, then Finish.
- Select Restart once the restore point is applied.
Windows should boot the chosen restore point, which did not have any software conflicts.
Boot Configuration Data (BCD) is a specific file that tells Windows how to load the system at startup.
If this file is corrupted or missing, then Windows cannot boot. It will not matter how many times you run Startup Repair. You must rebuild the database file for Windows to boot again.
To rebuild BCD in WinRE:
- Select Troubleshoot.
- Choose Advanced options.
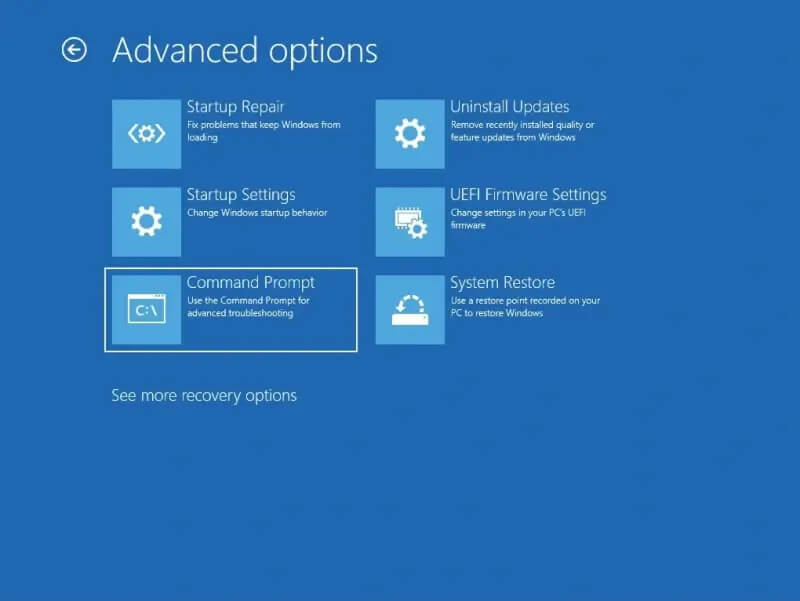
- Click Command Prompt.
- Type bootrec /fixmbr into the interface and press Enter.
- Type bootrec /fixboot and hit Enter.
- Type bootrec /scanos and press Enter.
- Type bootrec /rebuildbcd and push Enter.
- Type Y to add an installation to the boot list and hit Enter.
- Finish by typing exit and pressing Enter.
Restart your PC to try booting into Windows.
If not, move to the next method.
Method 5: Run CHKDSK and SFC in Command Prompt
Editor’s Note: CHKDSK has a higher risk of permanent data loss. The built-in tool is designed to examine and repair the file system, but it can strand data in inaccessible sectors. In addition, CHKDSK can overwrite metadata and truncate files on the drive. You should consult an SSD or hard drive recovery expert before running CHKDSK if your device contains important data.
CHKDSK is a command that scans the file system and storage medium for damage.
The tool also includes a set of parameters that attempt to repair any logical errors. CHKDSK could address issues that cause boot failures, but it could result in data loss as well. Assess the value of stored data before prompting CHKDSK to attempt to fix a failed drive.
To run CHKDSK in WinRE:
- Click Troubleshoot.
- Select Advanced options on the Troubleshoot screen.
- Choose Command Prompt from the list of options.
- Type chkdsk C: /f /r, possibly swapping C: with a newly assigned letter of the system drive.
- Press Enter.
This process can take 30 minutes to a few hours to complete. It depends on the drive's condition and size.
Editor’s Note: If CHKDSK reports bad sectors, then do not continue troubleshooting the problem. Your storage device is most likely failing. Especially if it shows signs of abnormal behavior or produces strange sounds, such as hard drive clicking or beeping. Contact a certified service if you need data recovery.
Once CHKDSK is done, run System File Checker (SFC).
SFC checks Windows for missing data or corrupted system files and replaces them with clean copies from a cached version.
To run SFC in WinRE:
- Select Troubleshoot from the main options.
- Choose Advanced options.
- Click Command Prompt.
- Type sfc /scannow in the interface.
- Hit Enter.
- Type exit once SFC is finished scanning, then press Enter.
If SFC cannot repair the system files, then the Windows component store is damaged.
You could try running a DISM command from Windows installation media to repair the system image. However, the odds of a successful outcome are fairly low given the other CHKDSK and SFC reports.
Method 6: Uninstall Recent Drivers and Software in Safe Mode
Safe Mode runs a lightweight version of Windows with only essential drivers and services.
You can use Safe Mode to bypass third-party software on the PC. It allows you to remove recently updated drivers or newly installed software that might interfere with the boot process.
To uninstall drivers and other software in Safe Mode:
- Choose the Troubleshoot option in WinRE.
- Click Advanced options.
- Click Safe Mode.
- Right-click the Start icon on the taskbar and select Device Manager.
- Search for devices with a yellow warning icon.
- Right-click the flagged component and select Uninstall device.
- Click Settings in the Start menu, then select Apps in the left sidebar and choose Installed Apps from the list.
- Filter by the affected drive (usually OS C:) and sort by Date installed.
- Click … next to the latest programs and select Uninstall.
Editor’s Note: If your PC cannot enter Safe Mode, then there is probably significant corruption.
Restart your computer to exit Safe Mode and see if Windows loads.
Method 7: Disable Automatic Repair
Editor’s Note: Turning off Automatic Repair is not a true solution. It is a step that buys you some time to further investigate the issue. You will still need to diagnose the drive and fix the underlying problem.
You can disable Automatic Repair in Command Prompt to break the boot loop and learn more information.
To disable Automatic Repair:
- Click Troubleshoot inside WinRE.
- Select Advanced options.
- Choose Command Prompt to launch the utility.
- Type bcdedit /set {default} recoveryenabled No in the interface.
- Push Enter.
- Type exit to leave the Command Prompt after disabling Automatic Repair.
Restart your system.
If it works, you should use advanced tools like Event Viewer to determine what is impeding Windows from starting.
Method 8: Reinstall Windows as a Last Resort
Reinstalling Windows is the most comprehensive method to fix a boot issue not caused by hardware failure.
Windows gives users the option to keep their personal files or remove data on the device. A backup with all vital data is recommended if possible.
To reinstall Windows in WinRE:
- Choose Troubleshoot in the menu.
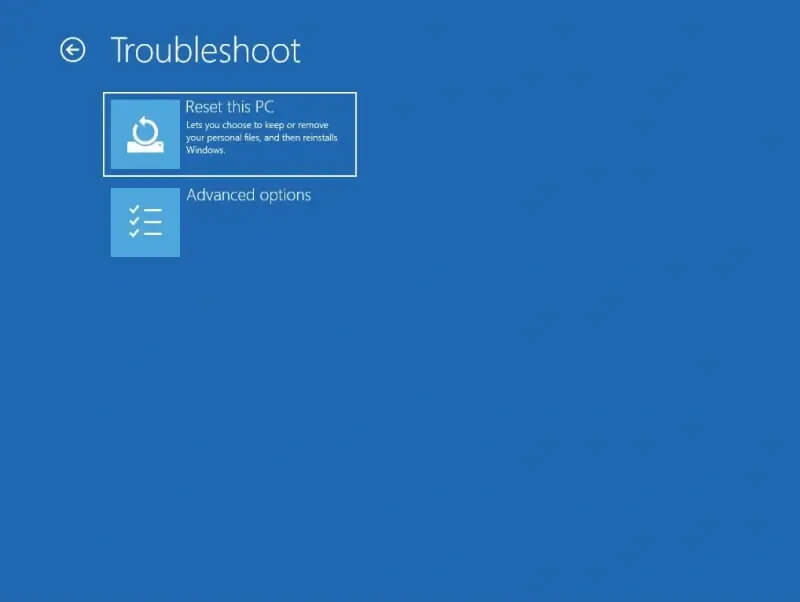
- Select Reset This PC.
- Click Keep my files or Remove everything, depending on whether you want to preserve your data or start fresh.
ditor’s Note: Resetting an encrypted drive will require the BitLocker recovery key. You might need a BitLocker recovery key bypass to access data without it.
Windows should take between 30 minutes and a couple of hours to reinstall. The timeline varies based on the media and chosen options.
If problems persist after resetting the PC, then the drive itself is the ultimate issue.
Lost Data After “Preparing Automatic Repair” Screen?
The engineers at Secure Data Recovery have faced every situation and provided reliable service. In fact, they have maintained a 96% success rate across all cases since 2007.
Our desktop and laptop data recovery specialists can retrieve files regardless of the manufacturer, storage device, or failure mode. We offer free diagnostics and quotes and back our work with a No Data, No Recovery Fee guarantee.
Call 800-388-1266 or fill out our form to get a free quote for data recovery and learn how it works.
Common Questions About “Preparing Automatic Repair”
Why am I stuck in a “Preparing Automatic Repair” loop?
The loop occurs when Windows detects a problem on startup and attempts to fix it. After failing, the computer often restarts and tries to repair the same issue again.
The most common causes for a boot loop are:
- Corrupted Boot Configuration Data (BCD)
- Damaged file system
- Faulty Windows Update
- Recently installed drivers or software
- Hard drive failure
In many cases, Automatic Repair lacks the tooling to resolve the boot errors. Working through the above methods in this guide addresses each of these causes in order.
Will “Preparing Automatic Repair” delete my files?
No. Automatic Repair does not target user data. It only attempts to repair configuration files. However, if your system drive is failing, running Automatic Repair repeatedly could cause data loss.
Stop using the device if you suspect physical damage or severe file corruption and need to recover data from it.
How long should “Preparing Automatic Repair” take?
It depends on several factors. A healthy SSD should complete the process within 30 minutes. HDDs might take an hour or two. If the repairs run for a few hours, then it may be stuck in a loop. Check the process for any signs of progress.
What does it mean if I cannot enter the Windows Recovery Environment?
It typically means one of three things if the Windows Recovery Environment (WinRE) fails to load:
- The WinRE partition itself is corrupted.
- The Boot Configuration Data (BCD) lacks a valid entry.
- The hard drive is failing.
If you cannot access WinRE, then local software solutions are out of reach. You will likely need to replace the drive to reboot the machine.
Is there a difference between fixing “Preparing Automatic Repair” on Windows 11 and Windows 10?
The causes are identical. The methods, for the most part, are similar. The main differences are cosmetic. For example, the recovery menu layout varies slightly between Windows 10 and Windows 11.
In practical terms, the Quick Machine Recovery (QMR) feature is not available on Windows 10. Also, there are some fringe issues in Windows 11 that do not affect Windows 10 users. Secure Boot and Trusted Platform Module (TPM) requirements can complicate rebuilds on certain systems.
In most cases, these differences will not impact the troubleshooting process.
Do Dell, Lenovo, Acer, and HP laptops get stuck on “Preparing Automatic Repair” more frequently?
These brands dominate the Windows laptop market. As a result, they account for the majority of reported boot errors. It does not indicate an inherent design flaw. Although the portable nature of laptops might make them more susceptible to physical damage.
That said, there are a few brand-specific factors owners should know. Older Dell, Acer, and HP laptops with compact hard disk drives are more likely to have corrupted boot files. Some Lenovo models have received software updates that triggered boot failures.
The fixes are the same regardless of these brand quirks.

Timothy Burlee

Timothy Burlee is a content writer for Secure Data Recovery Services. He specializes in various topics in the data industry, including data recovery technology, storage devices, and digital forensics. Throughout his career, he has covered complex concepts and provided accessible solutions for users. Before joining Secure Data, he worked as a freelance technical writer.