Whether erasing data, changing file systems, or addressing disk errors, formatting your hard drive for Windows can optimize data storage. Frequently, formatting is essential to ensure external storage’s compatibility, security, and performance. Secure Data Recovery, experts in RAID, SSD, and hard drive recovery, explains how to format a hard drive on Windows 10 and Windows 11. Those with macOS can also learn how to format a drive on Mac.
Why Format?
People format their hard drives for different reasons. Most format their hard drive to wipe sensitive data from the device before disposing, reusing, or selling it. Others need to change the pre-installed file system for compatibility with their operating system. In some cases, formatting can resolve persistent issues like file corruption.
Steps on How to Format a Hard Drive for Windows
Before beginning: Back up important data on another device or a cloud storage platform. This backup is the simplest method for restoring original data after reformatting. While data is often recoverable following formatting, the process will make your files inaccessible. To recover data from a formatted hard drive, stop using the disk immediately and contact us.
Next, close applications that could interfere with the formatting process. Finally, disconnect additional external devices to avoid software conflicts and minimize the potential of formatting the wrong drive.
If you are reformatting a hard drive you have used before, understand that these steps will erase the device’s contents. Proceed with caution.
Step 1: Access File Explorer or Disk Management
You can format a hard drive on Windows with File Explorer or Disk Management.
Open File Explorer by clicking the yellow folder icon on the Windows taskbar or searching for the application in the menu.
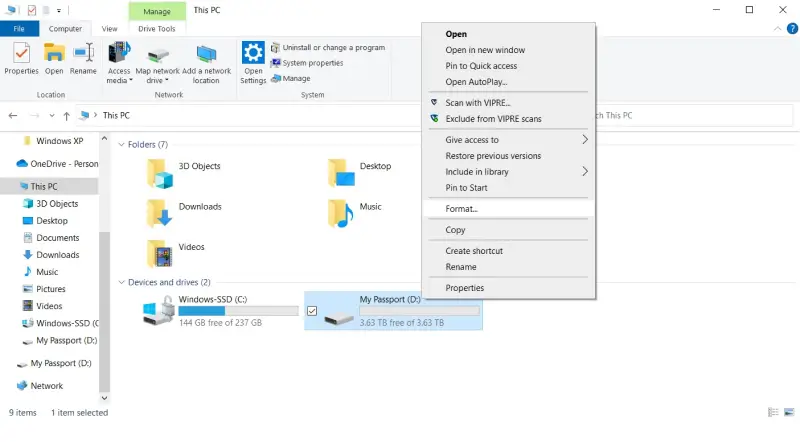
Right-click the desired drive under This PC in File Explorer and select Format. A window will appear.
Note: You cannot format the drive running your Windows operating system. Reformatting the system drive requires the creation of a bootable disk or cloned drive. However, any pre-existing issues on the source drive will transfer to the cloned drive and could prevent Windows from booting. For that reason, it is often better to use a bootable disk to install a clean, error-free version of Windows.
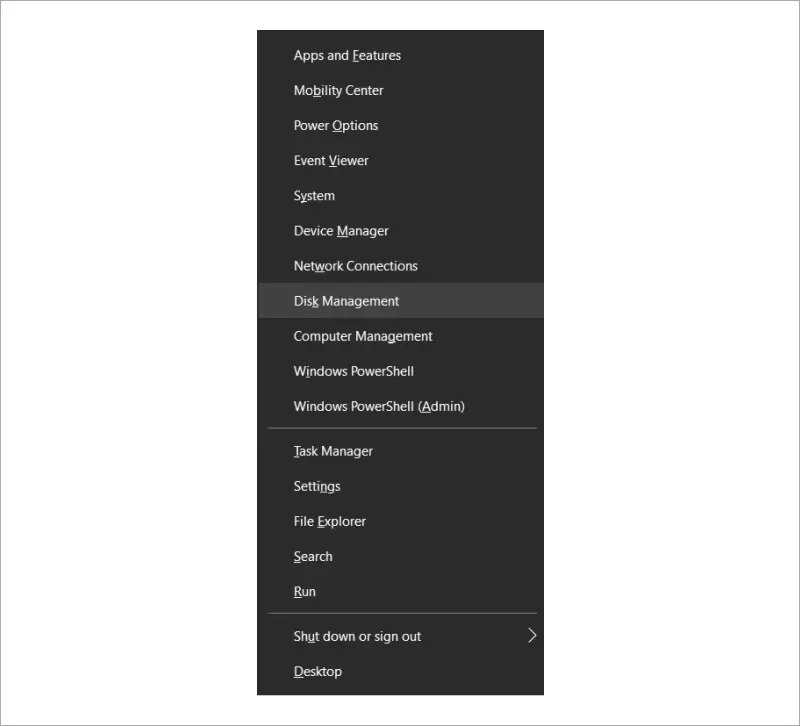
You can also use Disk Management to format a hard drive. To access the disk utility, press the Windows and X keys together. Click Disk Management in the context menu.
If the device is not visible, try these steps for fixing a hard drive not showing up on Windows.
Step 2: Choose the File System
A file system is the method or structure by which an operating system records, retrieves, and organizes data. Choosing the appropriate file system is critical. The choice impacts important factors like compatibility, security, and performance.
Windows has three popular file systems:
- NTFS: Microsoft’s proprietary file system. NTFS became the default file system in Windows 2000. It is designed for large files and high-capacity hard drives. NTFS offers the most modern features, including journaling and encryption.
- exFAT: A file system optimized for external storage like USB flash drives and SD cards. exFAT also has cross-platform compatibility and supports large files (like high-definition video) and volumes. That makes it suitable for external hard drives that will be used on Windows computers and Macs.
- FAT32: FAT32 is a predecessor of exFAT for legacy storage devices. Its universal compatibility with Windows, macOS, Linux, and DOS can make it a reasonable choice. However, FAT32 is unavailable on volumes larger than 2 TB and has file-size limits of 4 GB.
In general, NTFS is the best file system for most people. Its advanced features and continued Microsoft support provide a smoother Windows experience. Those who need cross-platform compatibility can consider formatting their hard drive with exFAT or FAT32.
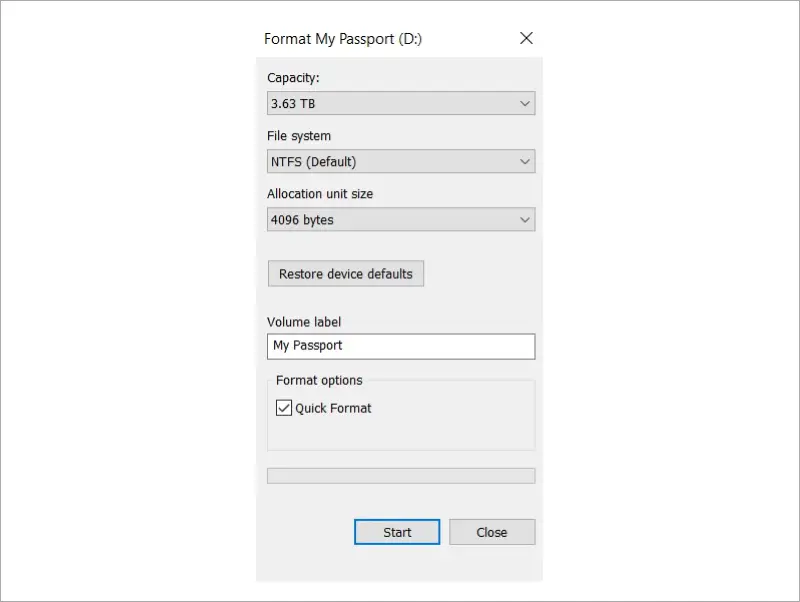
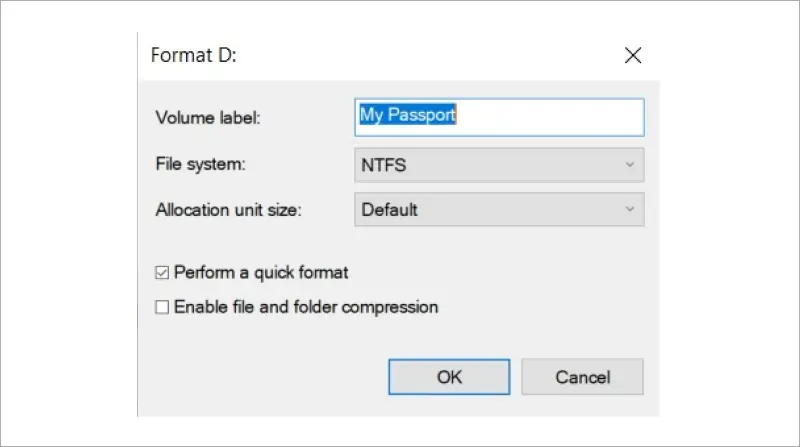
Once you’ve decided, choose the preferred file system from the dropdown menu in the File Explorer window.
If you used Disk Management to format your hard drive, right-click on the desired volume. Click Format in the context menu.

Select the file system from the list of options.
Step 3: Assign Volume Label
Giving the hard drive a descriptive or recognizable volume label can help distinguish specific devices. Enter the label in the text field. Volume labels can contain a combination of letters, numbers, and spaces.
In the below examples, the original volume label is kept.
Here is the volume label in the File Explorer window:

The volume label in Disk Management can be found here:

Step 4: Select Format Options
A quick format is the default option in File Explorer and Disk Management.
Generally speaking, a quick format is appropriate when preparing a hard drive for immediate use or reuse. Some cases where quick formatting makes the most sense includes changing the file system or reinstalling the operating system.
To opt for a full format, deselect the checkbox indicating a quick format.
To opt for a full format, deselect the checkbox indicating a quick format. -Full formatting overwrites all working data on the drive. The previous data is often unrecoverable. A full format is essential for sanitizing hard drives before disposal or resale.
Format options are located at the bottom of the window in File Explorer.
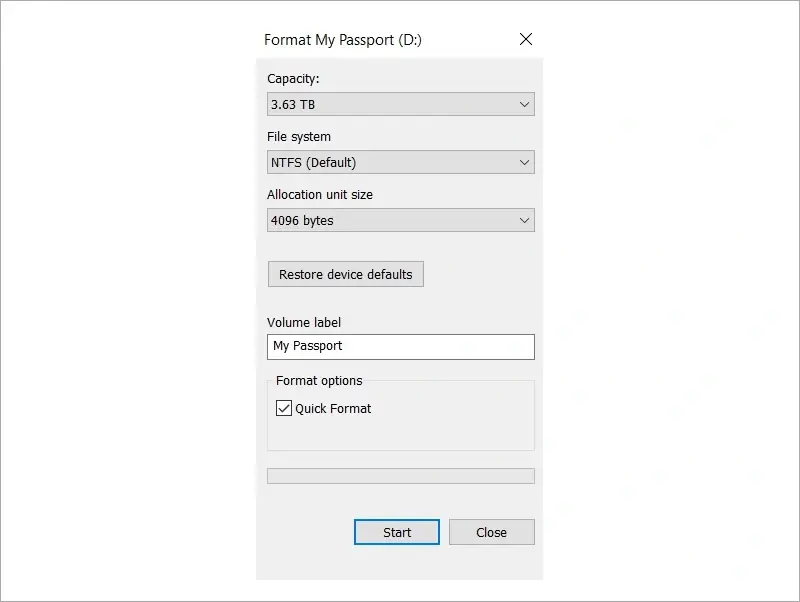
In Disk Management, you can find additional formatting options under the volume label, file system, and allocation unit size.

Step 5: Confirm Formatting
Hitting Start in File Explorer or OK in Disk Management will prompt Windows to request confirmation.
Remember: Your data will be inaccessible after formatting. Create a backup if you want to recover or restore your files, even if they are currently corrupted.
Once authorized, Windows will format the hard drive. This could take a moment.
Once authorized, Windows will format the hard drive. This could take a moment. -After formatting: You might need to assign a new drive letter to the formatted drive. If so, open Disk Management again. Right-click the unassigned drive and select Change Drive Letter and Path. Click the Choose button, pick the letter in the menu, and press OK.
Quick Formatting vs. Full Formatting
As mentioned, there are two different options for formatting your hard drive. These options apply whether you are formatting an internal or external hard drive.
Quick Formatting
The quick format option is faster. It skips sector checks and resets the address tables without overwriting the data. Though inaccessible, the deleted data remains in unallocated space on the disk. That means some data recovery services and software can extract the formatted files if needed.
A quick format is good enough if creating a new file system is the only consideration.
Full Formatting
Full formatting is a more comprehensive process that erases all data on the drive and checks for bad sectors. During this process, the entire disk is overwritten with zeros or random data to ensure that the files are permanently erased and cannot be recovered.
A full format can be time-consuming, depending on the size of the drive. This method is typically used when you want to wipe a drive. You can also opt for a full format if you suspect other issues with the drive, like bad sectors.
Formatting on HDDs vs. SSDs
A hard disk drive (HDD) and a solid-state drive (SSD) are different storage technologies. Hard drives record and retrieve data on magnetic disks while SSDs store data in memory cells. As a result, there are some unique considerations for each drive.
HDDs (Hard Disk Drives):
Formatting is straightforward on HDDs. You can repeatedly format a hard drive without impacting its lifespan or long-term performance. You could choose a quick format to change the file system, then perform a full format for a fresh start. Your hard drive will continue to function regardless of the frequency or type of formatting.
In addition, the design of hard drives means deleted data is often more recoverable than similar scenarios on flash storage.
Formatting HDDs does not require further understanding of the device. You just need to follow the above instructions.
SSDs (Solid State Drives):
On the other hand, formatting SSDs requires some knowledge of its architecture, write endurance and wear-leveling algorithms.
SSDs store data in memory cells with limited program/erase cycles. That means SSDs degrade over time until they finally fail. While formatting does not consume program/erase cycles, intensive read/write operations after formatting can reduce the lifespan of an SSD.
Manufacturers introduced wear-leveling algorithms to evenly distribute data across its memory cells to prolong SSD lifespan. More importantly, SSDs have garbage collection processes, such as the TRIM command. TRIM proactively erases invalid data from memory cells when enabled, greatly complicating data recovery efforts.
Be mindful of an SSD’s unique characteristics when formatting.
Troubleshooting Common Issues When Formatting
Even if you carefully follow all the steps in this guide, some problems can prevent formatting.
Here are the most common issues when formatting:
Here are the most common issues when formatting: -Physical damage. It can be difficult to format a hard drive with a damaged platter. Hard drive replacement is often the only feasible option if the damage is severe enough.
Outdated driver. A disk driver no longer compatible with the operating system or software could cause problems with formatting. To find the status of hardware drivers on Windows, search for Device Manager. Click Disk drives to expand the list, then right-click the target drive and select Update driver. You will have the option for Windows to automatically update the driver or install one manually.
Write protection. Write protection is a mechanism that restricts the writing, editing, or erasing of stored data. As a result, write protection can stop the formatting process. Disabling features like write protection is possible within the Command Prompt, but most experts do not recommend it.
Malware infection. Sometimes, malware can maintain a presence on an infected system by modifying the Windows Registry. If you were recently infected, running more scans could be necessary.
Give Us a Call if Formatting Your Hard Drive Goes Wrong
Secure Data Recovery can help retrieve lost files. Whether you’re dealing with accidental formatting, corrupted files, or damaged hardware, we can salvage your valuable data. With over a decade of experience, we have seen it all.
Our engineers have the expertise to recover deleted data from a hard drive after an accidental formatting. We can also repair a corrupted backup and restore the original data.
You will receive a free media evaluation and quote as part of your case. Our service options also include a 96% success rate and a “No Data, No Recovery Fee” guarantee. That means you get your data back, or pay nothing.
Experience the Secure Data Recovery difference.
Give us a call today at 800-388-1266 to regain access to your lost data.

Timothy Burlee

Timothy Burlee is a content writer for Secure Data Recovery Services. He specializes in various topics in the data industry, including data recovery technology, storage devices, and digital forensics. Throughout his career, he has covered complex concepts and provided accessible solutions for users. Before joining Secure Data, he worked as a freelance technical writer.