Formatting a drive prepares it for data storage by creating structures like directories or allocation tables. Formatting a Mac can erase data before disposal and resolve issues with file systems. Regardless of the reason, formatting often optimizes performance and security. Secure Data Recovery, experts in RAID, SSD, and hard drive recovery, explains how to format a hard drive on macOS. You can also learn about formatting a hard drive on Windows.
Steps To Format a Hard Drive on Mac
Before beginning: Formatting your Mac will erase its stored data, making your files inaccessible. Back up important data to an external device or cloud storage platform. You can create copies of data with Time Machine, Apple’s built-in backup mechanism. Alternatives include manual backups and third-party services, but Time Machine will work for most people.
To create a backup with Time Machine:
- Connect an external storage device to the Mac.
- Open Connect an external storage device to the Mac. -System Settings in the Apple menu.
- Click Connect an external storage device to the Mac. -General in the left sidebar.
- Open Time Machine.
- Click Add Backup Disk for a new drive. Otherwise, choose the preferred disk.
- Click Use Disk to confirm the selection.
Time Machine will back up the Mac on the external device. Using this backup is the easiest method of restoring files after formatting.
Note: iCloud is not a backup service. It is a synchronization service. If you format the system drive and iCloud synchronizes with your Mac after formatting, you will lose valuable data.
After creating a backup, close active applications to avoid interference while formatting. Even programs running in the background could interrupt formatting. You can close an open app on macOS by holding Command and Q. Right-clicking the application’s icon in the Dock and selecting Quit is another option.

Next, disconnect all external devices from the Mac. Their software could conflict with formatting, or you could accidentally overwrite the wrong drive.
While there are many formatting methods, this guide will outline the process with Disk Utility, the default tool within macOS.
Step 1: Open Disk Utility
To open Disk Utility, simultaneously press Command and Spacebar. Type Disk Utility into the search field of the Spotlight feature. Hit Enter.
You can also click the blue-faced Finder icon in the Apple menu, navigate to Utilities, and then open Disk Utility.
Below is the main window of Disk Utility.
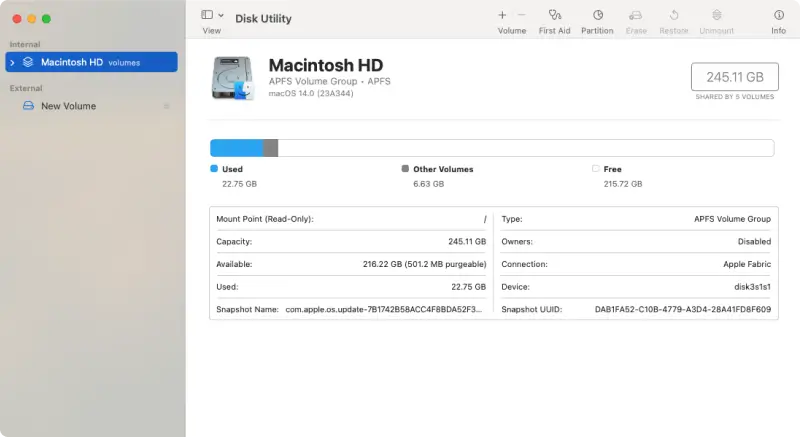
Step 2: Choose the Volume
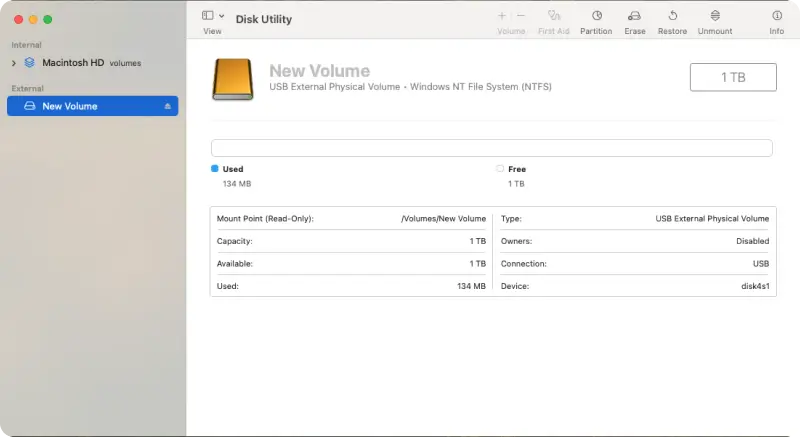
Now, choose the volume you want to format from the sidebar on the left. Disk Utility will list all available internal and external drives.
If you do not see your drive in the sidebar, click View and Show All Devices.
If the device still does not appear, consider these solutions for external hard drives not showing up on Mac.
Note: Unlike Windows, macOS allows you to format the system drive. The system drive is usually an internal storage device containing the operating system and other essential files. Erasing your Mac’s system drive will overwrite its contents. Do not format the system drive without a reliable backup.
Step 3: Select the File System and Scheme
After choosing the desired drive, click the Erase button in the menu at the top of Disk Utility. A new window will warn you that formatting will permanently erase all data stored on the volume. Remember to save irreplaceable data elsewhere.
Next, click Format and review file system options in the pop-up menu. A file system records, retrieves, and organizes data on a storage device. Select the file system that reflects your compatibility, performance, and security priorities.
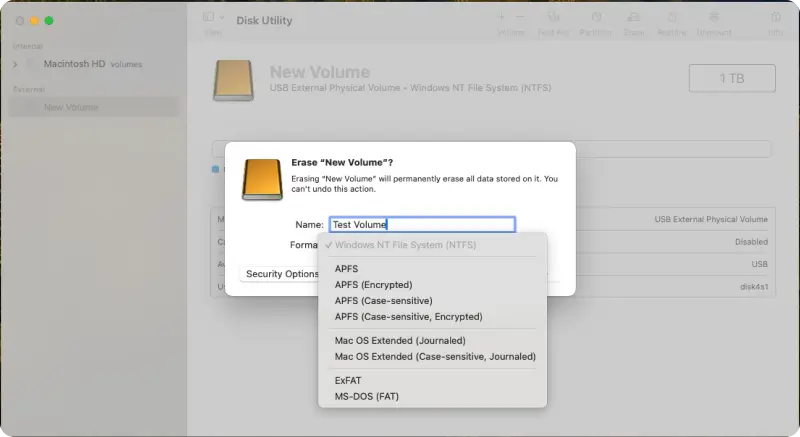
Here are the file system options on macOS:
- APFS: Stands for Apple File System. Deployed in 2017, Apple’s default file system supports many advanced, modern features, including encryption. Using APFS delivers the best macOS experience for most people.
- Mac OS Extended: Journaling file system developed by Apple and introduced to macOS in 1998. Mac OS Extended is also known as HFS Plus or HFS+. The file system has the advantage of compatibility with older versions of macOS.
- ExFAT: The preferred cross-platform file system. Choosing ExFAT means the same drive can read or write data on a Mac and Windows computer.
- MS-DOS: Legacy file system. Compatible with older versions of Windows, from MS-DOS to Windows 2000.
While Apple offers case-sensitive, journaled, and encrypted APFS or Mac OS Extended formats, the primary benefits do not change.
If you need help choosing the appropriate file system, consult the following table or read our in-depth APFS vs. Mac OS Extended comparison.
ScenarioFile SystemReasonGeneral use on Macs running macOS Mojave (June 2018) or later.APFSIt ensures the smoothest operation of macOS.General use with SSDs or Fusion DrivesAPFSIt optimizes the performance of each storage device.General use on Macs of different generations.Mac OS ExtendedIt is compatible with recent and older versions of macOS.General use on a Mac and Windows computer.ExFATIt is compatible with macOS and Windows.General use on a Mac and antiquated Windows computer.MS-DOSIt is compatible with macOS and legacy versions of Windows.
Once you select a file format, you must assign a scheme. Choose GUID Partition Map unless you formatted the drive with ExFAT or MS-DOS. In that case, use Master Boot Record.
Disk Utility also provides a field to name the storage device. The drive’s name can be generic or unique, though it should be recognizable to you.
Optional: Some storage devices have a secure erase function. Secure erase performs multiple passes to overwrite data, preventing unauthorized parties from recovering sensitive information. The function can be helpful in situations where you are repurposing or reselling your drive. You can adjust these settings by clicking Security Options. Proceed cautiously, as this will wipe all working data from the drive.
Step 4: Confirm Formatting
Click Erase in the dialog box after making your selections. Wait for the formatting process to finish. The duration depends on the device, capacity, and file system.
Click Done once formatting is complete.
Quick and Full Formatting on macOS
Modern Macs perform a quick format by default, but most systems can also execute a full format. Full formatting is presented as a secure erase function in Security Options on macOS. The best formatting option depends on the situation.
Quick Formatting
Quick formatting is a convenient option for people to prepare their drives for initial use or reuse. A quick format erases the file system, but deleted data still resides in unallocated space of the external hard drive. As a result, a professional data recovery service can often recover files from a hard drive after quick formatting. A quick format is fine if you only want to create a new file system on your current drive. However, a quick format could expose valuable data if you are not keeping the device.
Full Formatting
While full formatting sets up a file system, it also securely erases the data stored on the drive. Secure erase overwrites the device with zeroes or pseudorandom data. You can modify these settings within Security Options in Disk Utility. A full format is more time-consuming but could protect personal or private data if you plan to discard the drive.
Formatting HDDs and SSDs for Mac
Apple began to transition toward SSDs in Macs and MacBooks in 2010. Now, all Apple computers use SSDs for internal storage. Differences in magnetic and flash storage mean each device has unique formatting considerations.
Hard Disk Drives (HDDs)
The practice of formatting a hard drive does not impact its lifespan or performance. Therefore, you can format a hard drive as frequently as necessary. Given how hard disks store data, external drive recovery is often possible in cases of accidental formatting.
Solid-State Drives (SSDs)
In contrast, the architecture of SSDs restricts the device to a finite number of program/erase cycles. SSDs store data in memory cells through an exchange of electric signals. A sophisticated controller manages the distribution of data across these cells, which degrade over time. SSDs utilize several algorithms and techniques to minimize this limitation. Still, repeated formatting can cause undue wear and shorten the SSD’s lifespan.
Apple Silicon vs. Intel Macs
In November 2020, Apple introduced a powerful ARM-based processor to Macs and MacBooks. Known as Apple Silicon, the series started with the M1 chip. They replaced the Intel processors that powered Macs for over a decade. Apple released a second-generation M2 chip in June 2022. As of November 2023, the entire Mac lineup runs on Apple Silicon processors.
While the Mac’s processor does not affect formatting in Disk Utility, using third-party tools could cause compatibility and performance issues. Applications that are not designed for ARM architecture could require translation in Rosetta.
Troubleshooting Formatting Problems on Mac
Sometimes, issues arise during or after the formatting process.
Error messages are among the most common problems people encounter when formatting a drive on macOS. You can try these potential solutions if the Mac reports Sometimes, issues arise during or after the formatting process. -“Erase process has failed” or “Couldn’t unmount disk”:
- Restart the computer and attempt to reformat.
- Boot into Recovery Mode and load Disk Utility from there.
- Update macOS to the most recent version.
- Check if a damaged cable or port is preventing a reliable connection.
- Download a third-party formatting tool.
If nothing fixed the issue, you can format your drive with Terminal.
If nothing fixed the issue, you can format your drive with Terminal. -Note: Terminal is the command-line interface of macOS. It is one of Apple’s most unforgiving applications. Improper commands can have irreversible consequences, including data loss and system instability.
If you wish to proceed, type Terminal in Spotlight and press Enter.
Here is how to format a hard drive using Terminal:
Enter “diskutil list” to see all available drives and their partitions.
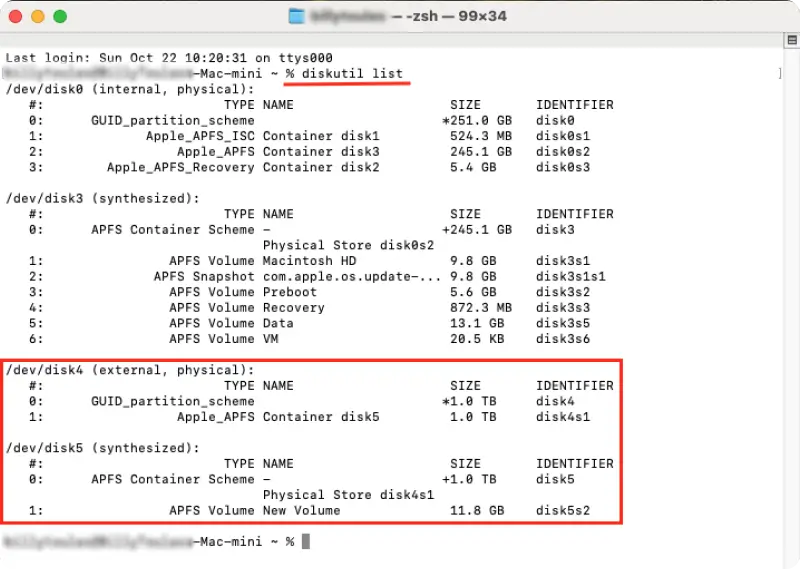
Identify the drive you want to format.
Enter “diskutil unmountDisk /dev /diskX” to unmount the drive. Replace X with the number of the target drive.

Enter “diskutil eraseDisk APFS MyDrive /dev/diskX” to format the drive. Replace APFS with the preferred file system, MyDrive with the name, and X with the number of the target drive.
Open the Apple menu if the drive will not format. Click About This Mac, then navigate to System Report and USB. If the drive appears, then macOS recognizes the hardware, which indicates a software issue. Upgrade the device’s drivers to the latest version from the manufacturer’s website.
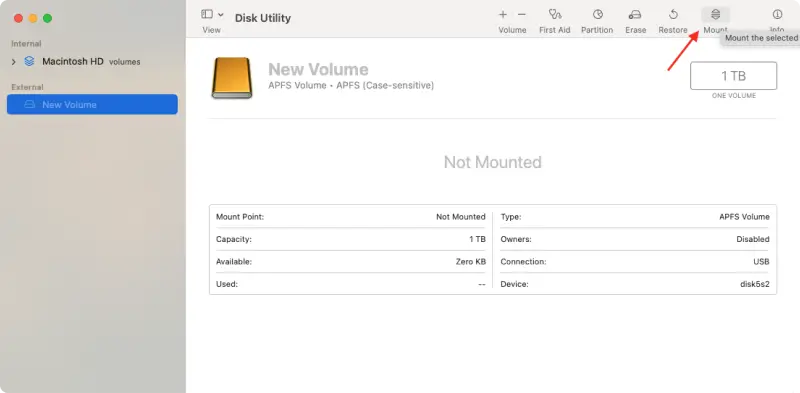
Lastly, check the drive’s visibility in Disk Utility and Finder. If it appears in Disk Utility, but Finder does not recognize it, you may need to mount it. In that case, click the Mount icon in the Disk Utility menu and select the drive in the sidebar.
If the problem persists, test the external drive on another Mac to determine if it is working.
If the problem persists, test the external drive on another Mac to determine if it is working. -Call the Experts if Formatting Leads to Data Loss
Accidental formatting occurs more often than most think. When that happens, Secure Data Recovery can help. We have over a decade of experience recovering deleted and formatted data from many storage devices. Our engineers have seen it all.
In addition, we specialize in Mac data recovery. Our Apple Certified Mac Technicians (ACMTs) have extensive knowledge of Mac hardware and software. We are also an Apple Authorized Service Provider (AASP) with access to the best tools and support. These certifications increase the likelihood of a successful recovery and reduce downtime.
As part of our service, we offer a free diagnostic and no-obligation quote. You will also receive a “No Data, No Recovery Fee” guarantee. You either get your data back, or pay nothing.
Experience peace of mind while we resolve your case.
Call us at 800-388-1266 to be reunited with your lost data.

Timothy Burlee

Timothy Burlee is a content writer for Secure Data Recovery Services. He specializes in various topics in the data industry, including data recovery technology, storage devices, and digital forensics. Throughout his career, he has covered complex concepts and provided accessible solutions for users. Before joining Secure Data, he worked as a freelance technical writer.