Few issues are more frustrating than plugging in your Western Digital external hard drive only to find your Mac doesn’t recognize it. Because WD drives store valuable data, it’s essential to diagnose the issue promptly. Ignoring connection or recognition problems can lead to further complications, including potential data loss.
Secure Data Recovery, the authority in RAID, SSD, and hard drive recovery, provides expert solutions on why your WD external drive may not work with macOS and outlines the key steps to restore access.
Step 1: Check the Basics First
Before diving into software fixes, start with the simplest checks. Many external drive recognition issues are caused by basic connection problems rather than complex technical faults.
- Inspect the USB cable and port.
- Test the power supply.
- Look for signs of activity.
- Test on another system.
Step 2: Check Finder Preferences
Sometimes, your Western Digital external drive is connected and functioning, but simply not set to appear in Finder. This is one of the easiest fixes and is often overlooked.
- Open Finder Settings. Open Finder, then click Finder in the menu bar and select Settings. For macOS Monterey and earlier, the option is called Preferences.
- Enable External Drives in the General Tab. Under the General tab, ensure the checkbox for External Disks is selected. This setting controls whether drives appear on your desktop when connected.
- Enable External Drives in the Sidebar Tab. Switch to the Sidebar tab and confirm that External disks is also checked. This ensures the drive appears in the left-hand navigation panel of Finder.
- Refresh Finder. Close and reopen Finder after adjusting these settings. If your WD drive was mounted but hidden, it should now appear either on your desktop, in Finder’s sidebar, or both.
Step 3: Use Disk Utility to Detect the Drive
If your WD drive doesn’t appear in Finder, the next step is to check whether macOS detects it at the system level. Disk Utility is the built-in tool for viewing, mounting, and repairing drives.
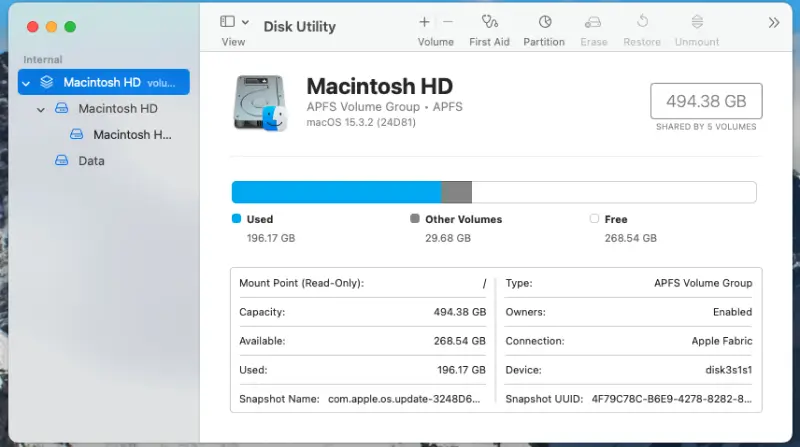
- Open Disk Utility. Go to Applications, then Utilities, and then Disk Utility. This window displays all connected storage devices, including those that aren’t visible in Finder.
- Look for Your WD Drive. If your drive appears but is greyed out, it means it has been detected but not mounted. Select it and click Mount in the toolbar. If mounting works, the drive should now appear in Finder.
- Run First Aid. With the drive selected, click First Aid. This process can repair directory corruption that prevents the drive from being mounted. Allow the tool to complete before testing the drive again.
- If the Drive Is Missing Entirely. If your WD drive doesn’t appear in Disk Utility at all, it may indicate a deeper issue, such as a failed enclosure, cable, or internal hardware fault.
Step 4: Reset NVRAM and SMC
Resetting the NVRAM (non-volatile random-access memory) and SMC (System Management Controller) can clear any settings that interfere with hardware recognition.
- Reset NVRAM:
- Shut down your Mac.
- Turn it on and immediately press and hold the Option, Command, P, and R keys.
- Keep holding for about 20 seconds, then release.
- Your Mac will restart with default hardware settings, which can resolve detection problems.
- Reset SMC:For Macs with Apple silicon:
- Shut down your Mac, wait 30 seconds, and turn it back on (the SMC resets automatically).
- Shut down your Mac.
- Press and hold Control + Option (Alt) + Shift for 7 seconds.
- Without releasing, press and hold the power button for another 7 seconds.
- Release all keys, wait a few seconds, and power on.
Step 5: Check macOS Security and Privacy Settings
macOS includes strict security controls to protect your system from unauthorized devices and software. While these features enhance safety, they can sometimes prevent your WD external hard drive from being recognised.
- Review USB Accessories Settings. Go to System Settings, then Privacy & Security, and then Allow accessories to connect. If this setting is set to “Ask Every Time” or “Don’t Allow,” your Mac may prevent the drive from mounting. Change it to “Allow New Accessories” and reconnect your WD drive.
- Grant Software Permissions. If your WD drive uses bundled software (such as WD Discovery), ensure it has the necessary permissions:
- Go to System Settings, then Privacy & Security.
- Under "Files and Folders" or "Full Disk Access," grant permissions to the WD software.
- Without these permissions, macOS may block the software from accessing or modifying the drive.
- Update WD Drivers or Utilities. Older WD utilities may be incompatible with newer versions of macOS, so it's advisable to download the latest software updates.
Step 6: Address File System Incompatibility
Many WD external hard drives are preformatted in NTFS, a file system optimized for Windows. In some cases, file system corruption or unsupported formats can prevent the drive from being recognized at all.
- Check the Drive Format. Open Disk Utility and select your WD drive. The format will be listed in the details panel. If it shows NTFS, FAT32, exFAT, or another non-macOS format, compatibility may be the issue.
- Use Third-Party NTFS Drivers. If you need both read and write access to an NTFS drive, install a reputable NTFS driver for macOS. This can restore full functionality without reformatting.
- Reformat the Drive. If the drive’s format is incompatible or corrupted, reformatting may be the only option.Warning: This will erase all data. Always back up important files first or consider professional recovery before proceeding.Open Disk Utility:
- Select your WD drive and click Erase.
- Choose APFS or Mac OS Extended (Journaled) for best compatibility with macOS.
- Click Erase to complete the process.
- Verify After Formatting. Once reformatted, reconnect the drive. It should now mount instantly and appear in Finder.
When To Seek External Drive Recovery on Mac
If your Western Digital external hard drive still won’t work with macOS after following the above steps, the problem may be beyond basic troubleshooting. Issues such as physical hardware failure, severely corrupted file systems, or encrypted volumes that macOS cannot access often require specialized tools and expertise. Continuing DIY recovery attempts in these situations can increase the risk of permanent data loss.
Secure Data Recovery offers specialised, comprehensive solutions tailored precisely to your macOS needs. Our team ensures a seamless, convenient data recovery process. Contact us at 800-388-1266 today to speak with our specialists and begin the secure recovery of your data.

Zane Kennedy

Zane brings a wealth of knowledge and insight to his role as a content writer at SecureData. With a focus on the latest news, strategies, and innovations in file repair technology and secure data storage, Zane aims to provide articles that are a definitive source for anyone looking to stay informed in this rapidly evolving field. Whether exploring the latest advancements in data recovery techniques or offering insights into effective data management strategies, his writing is an essential resource for professionals and enthusiasts alike.