It is always stressful when your hard drive encounters a critical error. A short DST check failure is no different.
Errors occur after the system's BIOS runs a short drive self-test (DST), and the check fails. DST is a diagnostic tool built into a Windows PC’s boot procedure. It flags hardware issues that could prevent a hard disk drive (HDD) or solid-state drive (SSD) from reading and writing data.
Our experts explain failed hard drives and short DST checks in this blog. We also offer potential solutions to the errors and advice on when to seek data recovery services.
What Short DST Check Means for Failed Hard Drives and SSDs
A short DST check is an automatic test that evaluates a hard drive or SSD's health at startup.
It is a core component of the SMART (Self-Monitoring, Analysis, and Reporting Technology) framework in Windows. The monitoring system collects data on the drive’s performance to warn users of possible problems before hardware failure.
A failed DST check can indicate physical damage, file corruption, or detection issues.
There are two types of drive self-tests.
A short DST check is a quick scan that gauges the system drive’s basic ability to store data. A long DST check is a more advanced, manual scan that examines the system drive’s physical condition and logical structure. Users must initiate all longer tests in the BIOS.
Example error codes include:
- 2000-0142: Frequently seen on Dell systems. Often signals imminent hard drive failure.
- SMART Hard Disk Error (301): Appears on HP desktops and laptops. Typically precedes fatal errors.
- Error Code 0x00007A: Reveals that Windows could not read data from a paging file. Suggests bad sectors, a failing controller, or faulty RAM.
Yet, pinpointing the exact problem can still be a challenge after a short DST warning.
How To Fix Hard Drive When Short DST Check Fails
The troubleshooting process for a short DST failure should accomplish four goals:
- Protect data stored on the device.
- Confirm an issue.
- Rule out minor problems with simple fixes.
- Resolve the error or diagnose the drive.
These steps will either address the underlying issues or make the need for a replacement drive clear.
Here is a table of common causes, symptoms, and possible solutions for short DST failed errors:
Below is our step-by-step guide to resolving a hard drive short DST check that failed.
Step 1: Create Backups
First and foremost, the best practice following a failed DST is to back up data or create a clone.
All other actions are secondary to saving the original data from the drive. Continued use of a failing storage device will increase the risk of data loss.
If the system seems fairly stable, then upload the most important data to a cloud service. It does not matter if you cannot access those files in their current state.
However, if there is strong evidence of imminent failure, then a normal backup might not be feasible. In that case, you will need to clone the failed drive to preserve its data. You can clone the device without causing further damage by creating bootable media for Windows. This approach copies the contents of the source drive to another disk without running the damaged device.
Having a backup could be the difference between a full recovery and permanent data loss. Even if the duplicated data still needs to be repaired by an expert.
Step 2: Check Loose Cables and Reseat
An overlooked explanation for a self-test failure is a poor connection, such as loose cables.
Check to ensure the device is firmly connected to the CPU. A desktop hard drive will have a SATA connector and a power cable. An M.2 NVMe SSD sits in a slot on the motherboard. Modern external hard drives and SSDs have a single connector that transmits both data and power.
Reconnect the HDD’s cables or reseat the SSD to confirm the failed self-test was not a one-time connection issue.
Step 3: Update Drivers
A corrupt or outdated driver could trigger a short DST failure. Drivers serve as translators within the PC’s storage stack. They allow Windows to send requests to the device and receive data from the media. A bad driver can cause a software conflict that impedes this exchange.
To update drivers:
- Press the Windows button and X at the same time.
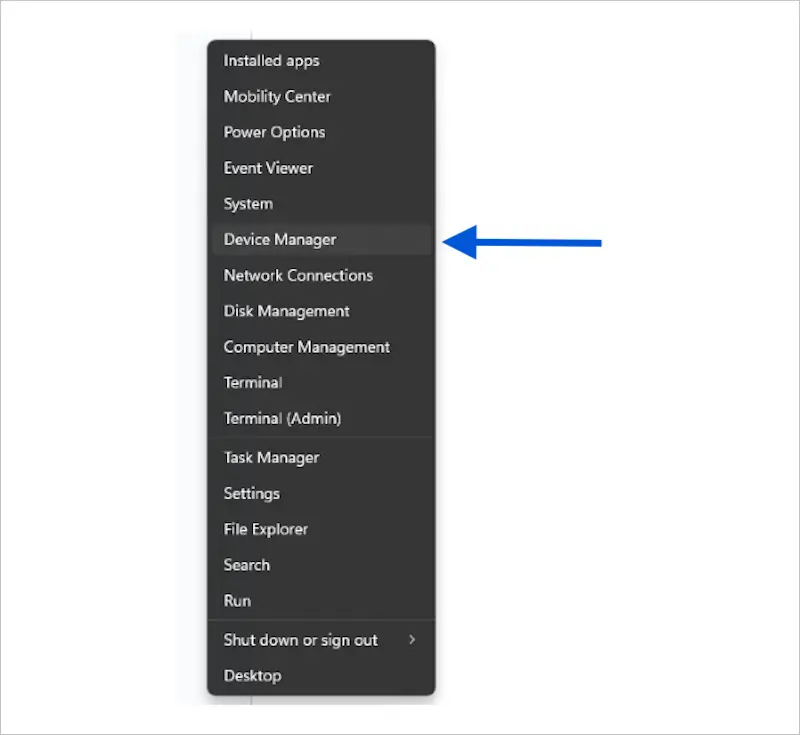
- Select Device Manager from the menu.
- Expand the Disk drives section.
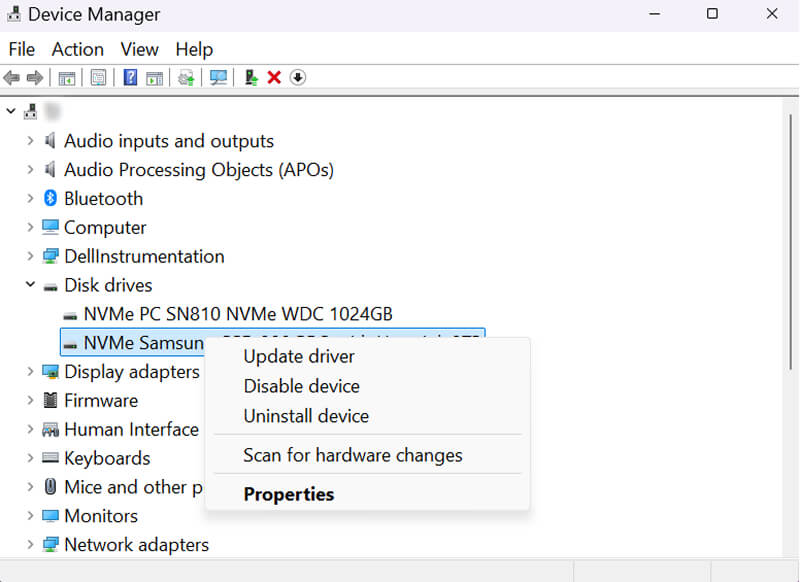
- Right-click the device, then select Update driver.
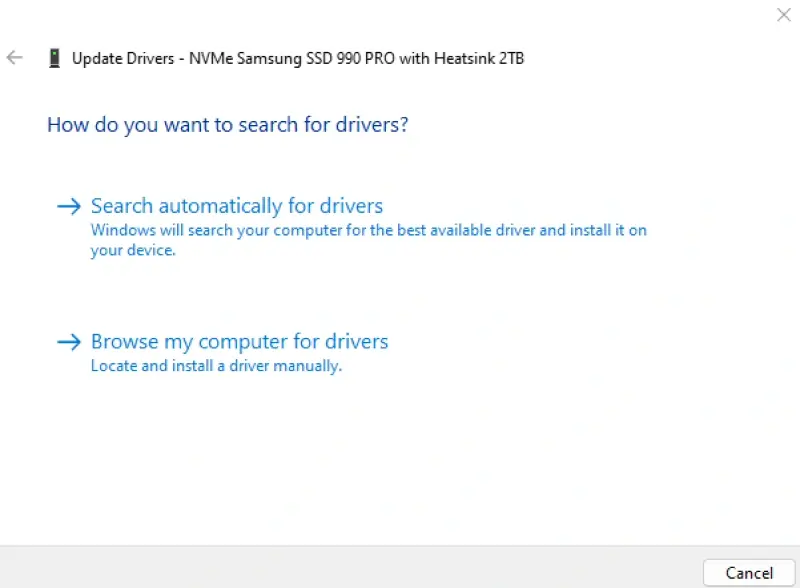
- Choose Search automatically for drivers for Windows to install updates.
- Repeat the process for Storage controllers and IDE ATA/ATAPI controllers.
Restart the computer to check if the error was resolved.
Step 4: Seek Professional Data Recovery
If retrieving files from the device is essential, then consider calling a certified data recovery service.
Running the drive despite errors could lead to increased physical damage or file corruption. Further troubleshooting would involve more invasive methods. These procedures can make the situation even worse.
The first attempt to recover data from a failed device is the best chance to restore files. SSD and hard drive recovery services with decades of experience have the expertise and equipment to handle complex cases. Sending the drive to a specialist as soon as possible is the most effective strategy to avoid total data loss.
Those who prioritize fixing their PC over recovering lost data can proceed to the next steps for potential solutions.
Step 5: Update Firmware
Sometimes, a short DST error is caused by firmware corruption. In these cases, a drive might appear as RAW instead of a default file system like NTFS or exFAT. Firmware corruption can occur due to improper ejection, sudden power loss, failed updates, or malware infection. Corrupt firmware often prevents the device and the system from passing instructions and data between them.
To update firmware:
- Visit the manufacturer’s website, such as Western Digital, Seagate, Toshiba, Samsung, SanDisk, Dell, or HP.
- Search for the firmware module for your specific model.
- Download the latest version and install it on the drive.
Restart the PC to see if the device still registers errors in the short DST check.
If not, the issue is likely more serious.
Step 6: Run CHKDSK
CHKDSK is a built-in Windows tool that attempts to relocate data from bad sectors and repair damaged file systems. However, running CHKDSK on a failing drive often has the opposite of its intended effect. The tool can lose clusters of data or overwrite files when addressing corruption.
Therefore, CHKDSK is among the last resorts for a DST failure.
To run CHKDSK on Windows:
- Enter Command Prompt in the search box on the Windows taskbar.
- Right-click the matching result and choose Run as administrator.
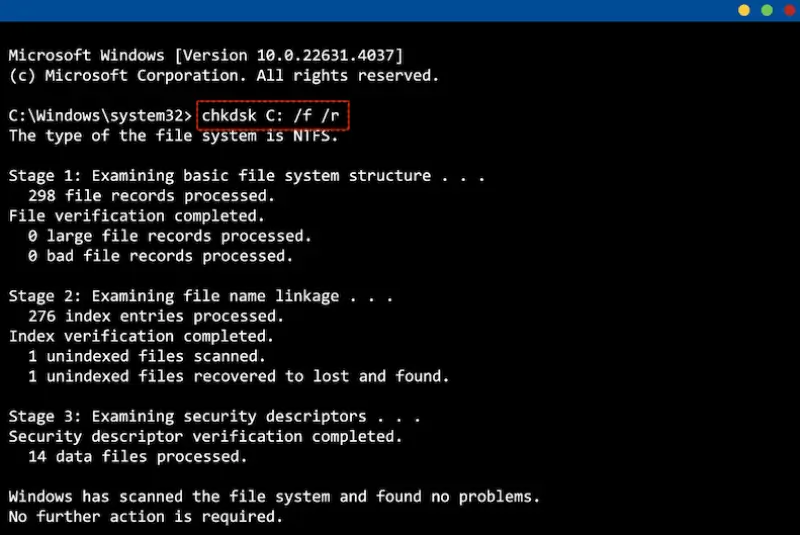
- Type chkdsk X: /f /r in the interface. Replace X in the command with the corresponding drive letter of the device.
- Press Enter.
- Enter Y if Windows asks to restart after running CHKDSK.
The scan might take a few hours to complete.
If CHKDSK fails to finish or reports a substantial amount of bad sectors, then hardware damage is almost certain.
Step 7: Perform System Restore
A restore is the last option to save your system.
System Restore is a native Windows recovery feature. It rolls back the computer to a point in time when the system was functional. In theory, the tool could clear a persistent software conflict that blocks communication between the PC and the storage device. Although hardware failure remains the most likely cause at this point in the process.
Note: You must have created a restore point before the failed test to try this method.
Warning: Restoring the system to a prior state will cause incremental data loss. Save recent data in a different location if possible.
To use System Restore on Windows:
- Hold the Shift key, click the Power icon in the Start menu, and choose Restart.
- Select Advanced options in the Windows Recovery Environment (WinRE).
- Select System Restore.
- Choose a restore point that predates the short DST failure.
- Follow the on-screen instructions and reboot the computer.
If your computer will not enter the WinRE menu, then turn it on and off three times. This sequence should launch Automatic Repair Mode.
Step 8: Replace the Drive If Failing
Repeated errors from the drive self-test indicate a damaged and defective device. You will need to replace it.
You will need to reinstall Windows and download the backup or recovered files to the new drive.
7 Tips for Hard Drive Maintenance
Hard drives stop spinning, and SSDs degrade. It is a fact of life. Preparing for these failures can reduce stress when that time comes.
Here are seven tips to best maintain drives and avoid sudden data loss:
- Schedule regular backups.
- Monitor hard drive health with SMART tools.
- Use surge protectors or USPs to protect against electrical events.
- Handle devices with extreme care.
- Put the system in a clean, cool, and dry place.
- Defragment HDDs and optimize SSDs.
- Keep drivers and firmware up to date.
These hard drive maintenance tips go a long way in safeguarding data from unforeseen failures.
Contact the Experts After Hard Drive’s Short DST Check Fails
Short DST failed errors are often a warning sign of a serious issue. Your device could fail at any moment.
Fortunately, Secure Data Recovery knows how to restore data on the device. Our experts are familiar with DST errors across models, file types, and failure modes. Trust the service with a 96% success rate, diagnostics at no cost, free quotes, and a No Data, No Recovery Fee guarantee. You get your data back, or pay nothing.
Call 800-388-1266, request help, or find a location to start your case and reclaim lost files on failed hardware.

Timothy Burlee

Timothy Burlee is a content writer for Secure Data Recovery Services. He specializes in various topics in the data industry, including data recovery technology, storage devices, and digital forensics. Throughout his career, he has covered complex concepts and provided accessible solutions for users. Before joining Secure Data, he worked as a freelance technical writer.