Sometimes, when you reboot or turn on your desktop or laptop, you might see the following message:
Getting Windows ready
Don’t turn off your computer
There are several reasons why Windows can get stuck on this screen. Regardless of the cause, it is a frustrating experience, and failure to fix the issue could lead to data loss.
If you’re stuck in a boot loop on Windows 10 or 11, we can help. Our experts offer troubleshooting tips and explain what to do when your computer is stuck on the “Getting Windows Ready” screen. And, if nothing resolves the issue, our data recovery services can often retrieve critical files from your system drive.
Step-by-Step Guide:
- Wait It Out
- Check Internet Connection
- Shut Down and Reset Computer
- Uninstall Windows Updates in Safe Mode
- Uninstall New Quality or Feature Updates
- Perform a System File Check
- Use the Startup Repair Tool
- Update BIOS and Drivers
- Restore the System to a Previous Point
- Reset Your Computer and Reinstall Windows (Last Resort)
Why Does “Getting Windows Ready” Become Stuck?
The “Getting Windows Ready” screen could become stuck for multiple reasons.
The “Getting Windows Ready” screen could become stuck for multiple reasons. -Common reasons why Windows might fail to load include:
- Pending installs. Updates or installations that were interrupted or not completed can result in Windows stalling during startup.
- Faulty Windows update. Failed quality or feature updates may lead to the system freezing on the loading screen.
- Software conflicts. Issues between Windows and third-party software can interfere with the boot process.
- Missing or corrupted system files. Corruption of key system files can prevent Windows from loading properly, leading to an indefinite startup.
How Long You Should Wait
Sometimes, Windows must go through several steps before booting to your desktop. These processes all happen in the background, so it can be difficult to track the progress. It is possible that nothing is wrong with your system and it simply needs more time. Make sure more than enough time has passed for the update to complete. In most cases, a few hours will suffice.
How To Fix “Getting Windows Ready” Stuck
A systematic troubleshooting approach will typically fix Windows boot issues and bypass the “Getting Windows Ready” screen.
First, we will walk you through a few common troubleshooting steps. If those don't solve the issue, we have a few more advanced steps below. Often, there is a simple solution that can solve a problem like this.
1. Wait It Out
As mentioned, Windows might just need more time to install updates. Some updates can take 2-3 hours to complete. If your system runs on a hard disk drive (HDD), you can check to see if its indicator is blinking. If it is, you may only have to wait it out.
2. Check Internet Connection
Alternatively, the issue could be that you’re not connected to the internet. If that is the case, your computer may be stuck on this screen because it needs a stable connection to proceed with the update process. Check your router or test another device (like your phone) on the same network.
3. Shut Down and Reset Computer
Even though the screen says “Don’t turn off your computer,” you may have to shut down your device with a power reset to fix the issue. A power reset (also known as a hard reset), can sometimes clear the memory cache.
Note: Turning off your computer on the “Getting Windows Ready” screen carries a risk of data loss and file corruption.
To perform a power reset:
- Disconnect all peripheral devices (such as USB devices, like USB flash drives, or external hard drives).
- Remove the power cable.
- Press and hold the power button for 10-15 seconds to shut down your computer.
- Wait 10-15 seconds to turn your computer on again.
4. Uninstall Windows Updates in Safe Mode
Before applying these solutions, you will need to learn how to access Windows Recovery Environment (WinRE).
Here is the recommended method to access Windows Recovery Environment:
- Turn on your computer (after turning it off).
- Hold the Turn on your computer (after turning it off). -Shift key down and press the power button at the same time.
- Continue holding the Turn on your computer (after turning it off). -Shift key as your machine powers on.
If the above approach does not work, you can also try these steps:
- Hold the power button down for 10-15 seconds to turn off your device.
- Press the power button again to restart your device.
- Once you see that Windows is starting (for example, the manufacturer’s logo shows on the screen), hold the power button for 10 seconds to turn off your device again.
- Repeat this three times total to enter WinRE.
If these methods don’t work, try using Windows Installation Media to Enter WinRE. You can download the media creation utility for your Windows operating system from the Microsoft software download page.
Use another device to download the software, then run it to create Windows installation media on a separate USB drive or disk. You can then use this external device to boot your computer.
A note on when and how to use Windows’ built-in repair tools: These tools are designed to fix system issues that prevent Windows from booting. However, they should be used carefully to avoid unintended consequences.
You can now enter Safe Mode to uninstall failed Windows updates. Safe Mode is a built-in environment designed to help fix your operating system.
Getting to Safe Mode involves similar steps to the methods above:
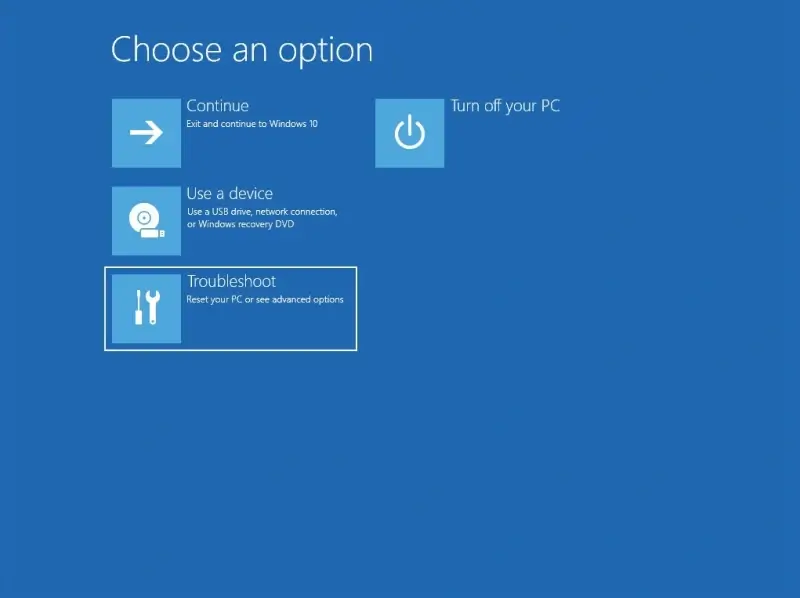
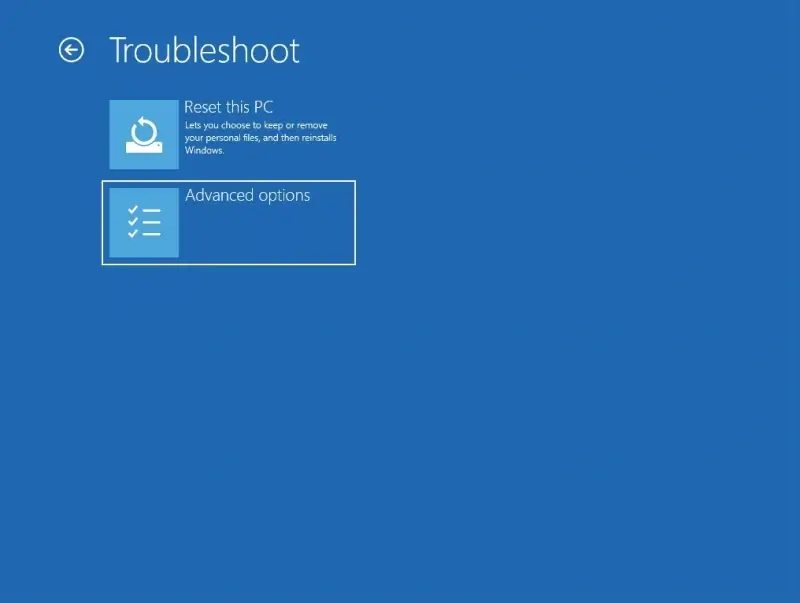
- Enter WinRE using the steps above.
- Click Enter WinRE using the steps above. -Troubleshoot, then Advanced Options.
- Click Enter WinRE using the steps above. -Startup Settings, then Restart.
- Choose one of the Safe Mode options from the list or Press F4.
Once you’re in Safe Mode:
- Type Control Panel into the search box on the taskbar.
- Click Programs and Features.
- Click Recently Installed Update.
- Select recent updates and uninstall them.
- Restart your computer.
New updates can sometimes cause compatibility issues with existing software. Removing them may help with boot issues. If the issue persists, move to the next solution.
5. Uninstall New Quality and Feature Updates
Windows quality and feature updates are meant to fix bugs and improve your experience, but they sometimes can cause issues with existing software or hardware and affect drivers. This is a common reason why a computer may keep crashing.
To try uninstalling quality and feature updates on your system, start by entering WinRE again. You use the instructions above to get back to this screen.
Once in WinRE, follow these steps to uninstall updates:
Click Troubleshoot.
Click Advanced Options.
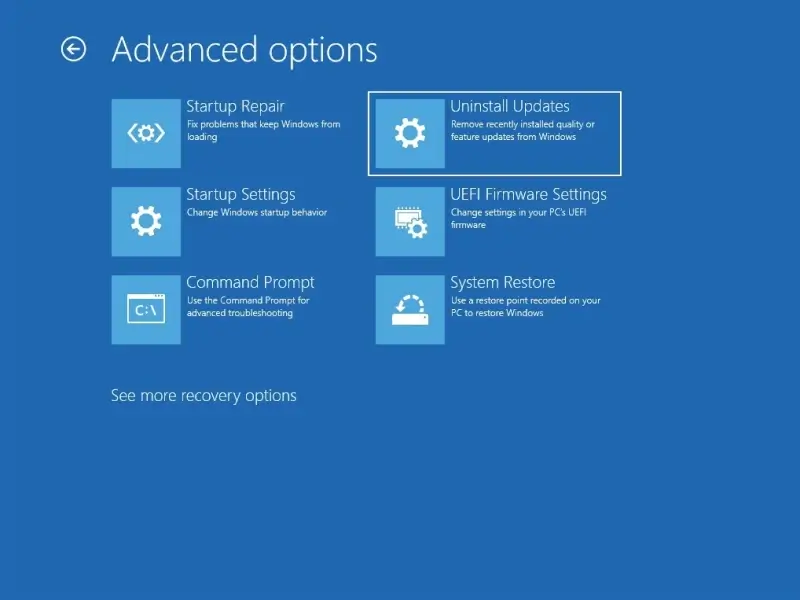
Choose Uninstall Updates.
Try uninstalling the latest quality or feature updates.
Restart your computer.
6. Perform a System File Check
If none of the methods we’ve recommended up to now have worked, and you’re not confident using command prompts on a computer, you might want to consult a professional at this stage.
If you feel confident using command prompts, try performing a system file check. The System File Checker (SFC) scans the protected system files on your device and replaces corrupted ones with cached working copies. This can sometimes fix some operational issues.
Note: The design of CHKDSK and System File Checker can cause data loss. Assess the value of the files before proceeding.
To access and run the System File Checker, follow the steps in previous methods to reach the Advanced Options menu from WinRE. From there, follow these steps:
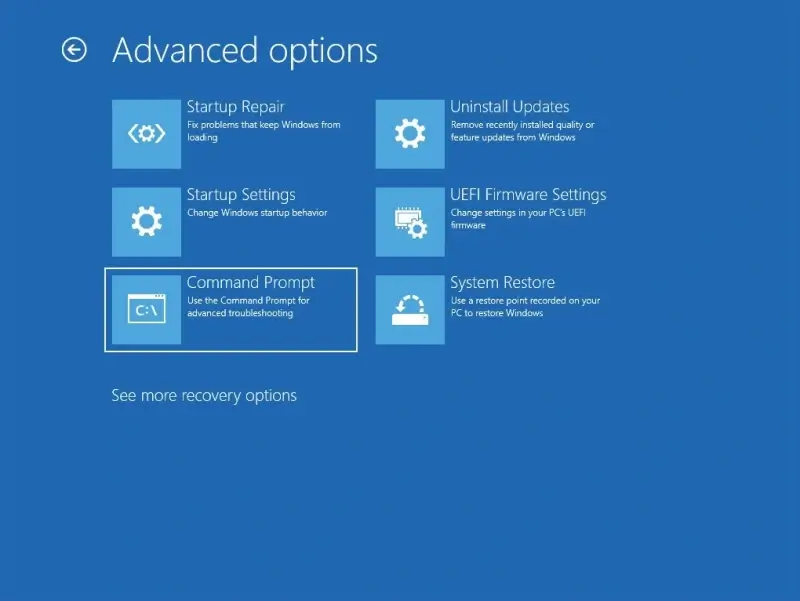
- Select Command Prompt in the Advanced Options menu.
- Type in “sfc /scannow” and press Enter to begin the system scan.
- Once the scan is complete, type in “chkdsk / f c:” (Replace “c:” with the drive where Windows is installed if different) and press Enter.
- Reboot the computer once the scan reaches 100%.
If you are still experiencing the same problem, try the following.
7. Use the Startup Repair Tool
The Startup Repair Tool performs diagnostics, analyzing startup log files to determine the cause of the problem and then trying to fix the problem.
Once you’ve entered WinRE, you can access and use the Startup Repair Tool through the following steps:
Click on Troubleshoot in WinRE.
Click Advanced Options.
Click Startup Repair in the Advanced Options menu.
Select an account from the Startup Repair screen. You will need admin privileges to proceed.
Enter your password.
Click Continue to start the repair tool.
Give the Windows Startup Repair Tool time to run.
Restart your computer once it is finished.
If you start your computer and get stuck on the loading screen again, move on to the next troubleshooting step.
8. Update BIOS or Drivers
An outdated BIOS or driver conflict could also cause Windows to enter a boot loop. Without access to Safe Mode, you can sometimes circumvent these issues by updating the BIOS or drivers from WinRE.
Note: These steps can contribute to further system instability. Exercise caution when updating BIOS or drivers, especially without valid backups of critical data.
To update the BIOS on Windows:
- Download the BIOS update file to a bootable USB drive (FAT32 format) for your motherboard or laptop model from their support website.
- Click Troubleshoot in WinRE.
- Click Advanced Options.
- Select UEFI Firmware Settings.
- Select the BIOS Update or equivalent option within the menu.
- Select the desired BIOS file from the USB drive.
- Restart your computer.
To update drivers in Windows:
- Download the desired drivers to a bootable USB drive from the device’s support website.
- Click Download the desired drivers to a bootable USB drive from the device’s support website. -Troubleshoot.
- Click Download the desired drivers to a bootable USB drive from the device’s support website. -Advanced Options.
- Click Command Prompt.
- Enter cd X:\DriverFolder in Command Prompt to navigate to the . (Note: Replace X with the actual drive letter and DriverFolder with the actual folder name.)
- Enter pnputil /add-driver drivername.inf /install in Command Prompt. (Note: Replace drivername.inf with the actual driver file name.)
- Restart your computer.
9. Restore the System to a Previous Point in WinRE
Once you’re in WinRE, you can also restore your operating system to a prior point or date if you have any saved. System Restore creates restore points either automatically, such as when you install new apps, drivers, or Windows updates, or manually when you create them. If system updates are creating problems, you can restore your Windows system to a previous restore point, removing the update without affecting all your personal data.
Note: Any files saved between the current point in time and your previous point will be lost during a System Restore. Make sure the data is backed up or non-essential.
To restore your system from a previous restore point, follow these steps:
Follow the steps above to enter WinRE again.
Click Troubleshoot.
Click Advanced Options.
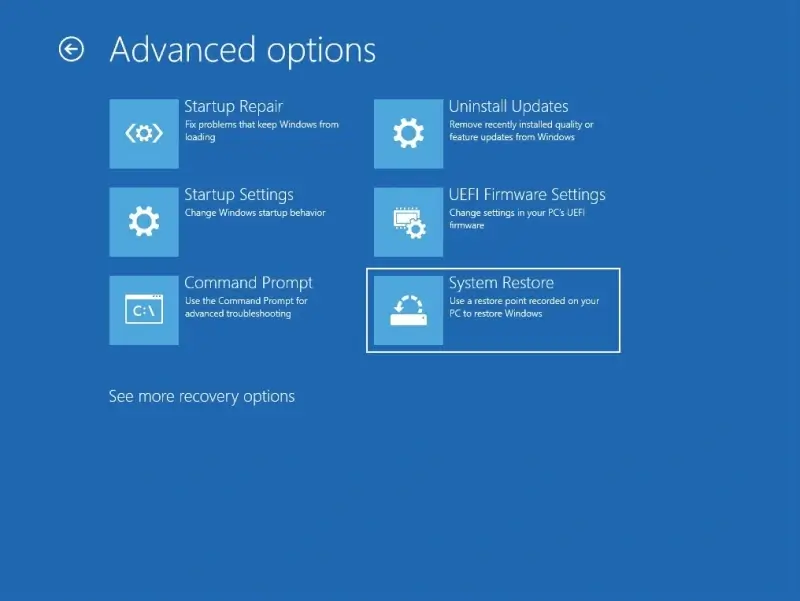
Click System Restore.
Select a restore point and follow the on-screen instructions.
Remember, any new data that was created after the chosen restoration point may be lost. Also, in some cases, the restore may not work and could lead to other error messages.
10. Reinstall Windows (Last Resort)
If none of these methods work, you can try to reset your device.
This is a drastic step, so you might want to consult a professional first. It could potentially overwrite your files. If you want to proceed with resetting your device, follow these steps:
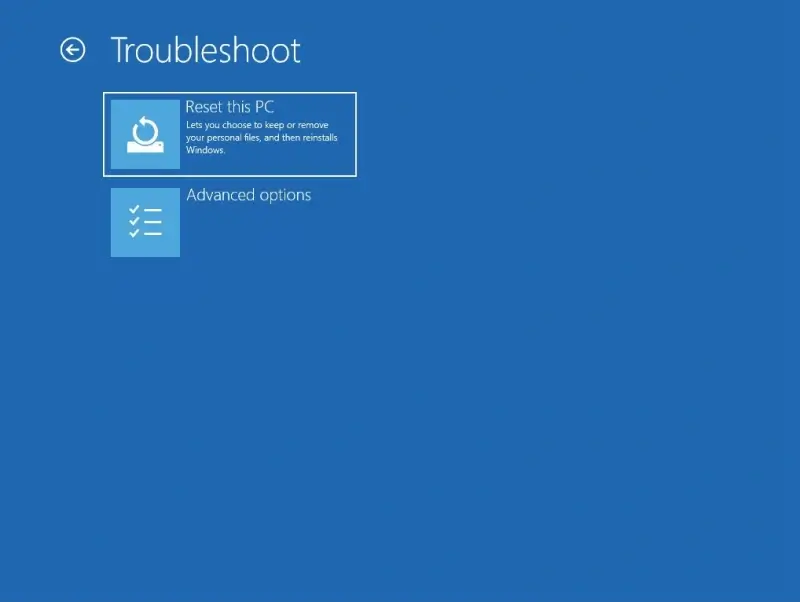
- From the Troubleshoot menu, select Reset This PC.
- Choose Keep My Files or Remove Everything. (Note: Even if you choose Keep My Files, you could still lose data. Proceed cautiously.)
- Click Local Reinstall and follow the instructions that appear on the screen.
Call Experts to Safely Recover Your Lost Data
Dealing with any computer error is frustrating, especially when the problem prevents you from using your device at all. If you’ve exhausted all efforts, it may be time to reach out to a data recovery expert.
Since 2007, Secure Data Recovery has resolved over 100,000 cases across every storage device and failure type. In the process, we have recovered billions of files. Our certified engineers can recover your data, too. Trust the SSD and hard drive recovery service with free quotes and a No Data, No Recovery Fee guarantee to restore lost files.
Call us at 800-388-1266, request help from an expert, or find a location to start a case and get your data back.

Yevgeniy Reznik

Yevgeniy Reznik is Laboratory Operations Manager at Secure Data Recovery Services in Cleveland, Ohio, and has more than a decade of experience as a data recovery engineer. He graduated from Cleveland State University with a degree in computer science and spent 15 years as an IT entrepreneur and small business owner before joining the company.