


Data destruction is essential. Since we live in a data-driven world, confidential files are more common and exposed than ever. As a result, users need an effective, user-friendly method of erasing sensitive data from storage devices. Introducing SecureShredder for Windows. The secure digital file shredder permanently removes personal or private data. Ensure no one can recover erased files with a free download of SecureShredder for Windows.
Free Data Erasure Software
A free download of SecureShredder provides peace of mind when users must purge confidential documents, financial statements, vital records, medical histories, trade secrets, or other information from their storage devices. The data erasure software is compatible with most sizes of internal or external hard disk drives and USB flash drives on Windows 7, 8, and 10.
SecureShredder serves a critical role in protecting data. That is because deleted data still resides on hard drives and flash drives even after deletion. When users erase something from an HDD or USB flash drive, the device’s file system marks the once-occupied space as available for rewriting. However, until overwritten, the deleted files remain in unallocated space, meaning a malicious actor could recover them with commercial data recovery software.
To mitigate the risk of a data breach from unsanitized hard drives, SecureShredder comes with multiple overwriting algorithms. Users can select a simple erasure that overwrites files with pseudorandom data. The quick, one-pass method creates unreadable files and prevents parties from accessing sensitive data.
However, SecureShredder has an advanced erasure option for users who want to remove all doubt. Though more time-consuming, the three-pass method complies with U.S. Department of Defense standards. The Media Sanitization overwrites all stored data with a series of zeros, ones, and random characters. At that point, recovering the device’s data is impossible with conventional tools and techniques.
In addition, SecureShredder offers several convenient features for free data erasure software. It supports drives larger than 4 TB and shows information on the partitions and volumes of an internal hard drive or device connected to the computer. When it comes to removing files from a hard disk or flash drive, SecureShredder gives users complete control over the sanitization process. Users can opt to delete a single file, erase specific folders, or wipe the entire storage device.
Personal or private data survives on HDDs and USB flash drives past deletion. Download SecureShredder and eliminate the remaining traces of data.
How To Use SecureShredder
Though SecureShredder contains complex algorithms, it is still user-friendly software. A novice can navigate its simple interface to wipe sensitive data from their system or external drive. It is just a matter of using the appropriate mode to achieve the desired result.
The following instructions explain how to use SecureShredder to erase data from a storage device.
Document Eraser
Document Eraser is the default mode for SecureShredder. Document Eraser gives users the option of overwriting file(s) or an entire folder with simple and advanced methods.
To erase file(s):
- Launch SecureShredder.
- Click Add Files under the “Select Data To Erase” section. Repeat as needed. In this example, we selected 2023 Annual Report.docx from the Documents folder of our C: drive.
- Choose one of the overwriting options under the “Select Erasure Method” section. Simple erasure method overwrites files with pseudorandom data. Advanced erasure method wipes data in accordance with the DoD 5220.22-M standard. In this example, we selected the advanced erasure method.
- Review all of the selections.
- Click Start under the “Select Document” section.
With these settings, the SecureShredder window should appear as seen below:

Users do not have to select a document stored on their C: drive. SecureShredder can erase most files regardless of their location. For example, users can connect an external hard drive (often labeled the D: or E: drive in the This PC directory) to delete documents, databases, spreadsheets, presentations, emails, images, videos, audio files, and more. However, SecureShredder cannot erase the system drive.
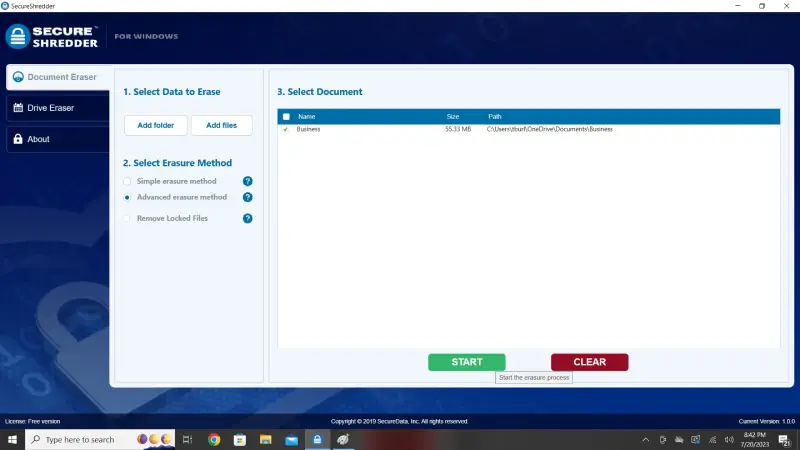
To erase a folder:
- Launch SecureShredder.
- Click Add Folder under the “Select Data To Erase” section. Warning: The whole folder structure is erased, including subfolders. Repeat as needed. In this example, we selected the Business subfolder in the Documents folder of our C: drive.
- Choose one of the overwriting options under the “Select Erasure Method” section. Simple erasure method overwrites files with pseudorandom data. Advanced erasure method wipes data in accordance with the DoD 5220.22-M standard. In this example, we selected the advanced erasure method.
- Review all of the selections.
- Click Start under the “Select Document” section.
With these settings, the SecureShredder window should appear as seen below:
For users with massive amounts of data, erasing individual files or even entire folders can be time-consuming. SecureShredder is equipped with options to address those situations.
Drive Eraser
Drive Eraser allows users to erase large quantities of files all at once. Like Document Eraser, Drive Eraser offers users multiple options. Users can clear the disk’s free space or delete the drive through simple or advanced methods.
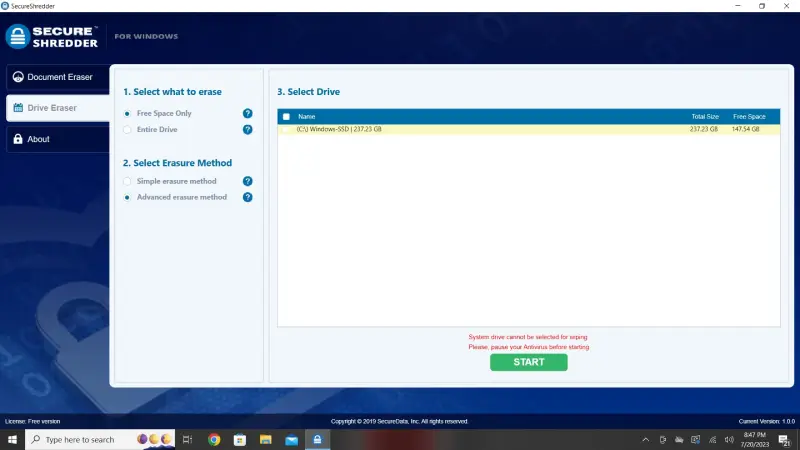
To clear the disk’s free space:
- Launch SecureShredder.
- Select Drive Eraser from the menu on the left side of the panel.
- Choose Free Space Only under the “Select What To Erase” section. In this example, we selected the C: drive.
- Choose one of the overwriting options under the “Select Erasure Method” section. Simple erasure method overwrites files with pseudorandom data. Advanced erasure method wipes data in accordance with the DoD 5220.22-M standard. In this example, we selected the advanced erasure method.
- Review all of the sections.
- Pause antivirus software.
- Click Start under the “Select Drive” section.
With these settings, the SecureShredder window should appear as seen below:
Clearing the disk’s free space is an important part of secure data destruction. That is because deleted data resides in a hard drive’s unallocated space until overwritten. To protect against malicious actors restoring files with sensitive data, users should clean their device’s free space.
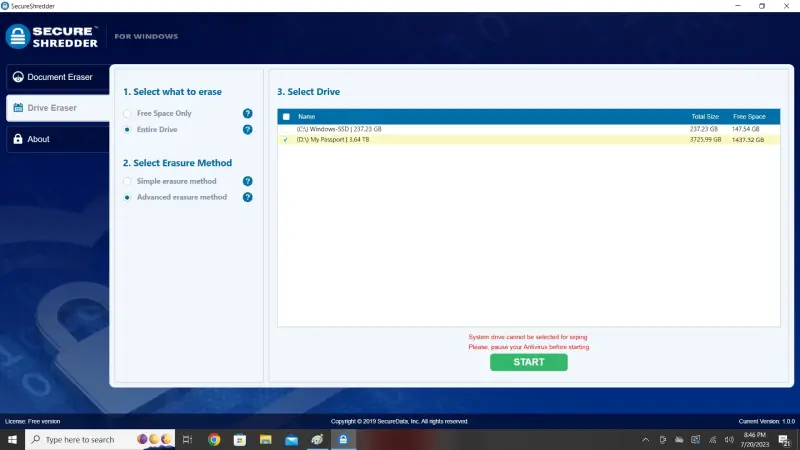
To erase an entire drive:
- Launch SecureShredder.
- Select Drive Eraser from the menu on the left side of the panel.
- Choose Entire Drive under the “Select What To Erase” section. In this example, we selected the D: drive. Note: Users cannot erase the system drive.
- Choose one of the overwriting options under the “Select Erasure Method” section. Simple erasure method overwrites files with pseudorandom data. Advanced erasure method wipes data in accordance with the DoD 5220.22-M standard. In this example, we selected the advanced erasure method.
- Review all of the sections.
- Pause antivirus software.
- Click Start under the “Select Drive” section.
- Click Yes to confirm.
With these settings, the SecureShredder window should appear as seen below:
Proper sanitation procedures can prevent a data breach.
Secure Data Erasure Software
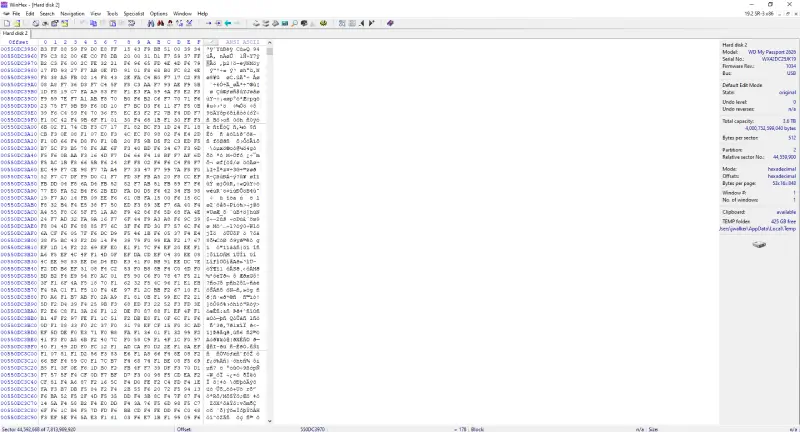
The above image shows the binary data of a specific file in a hexadecimal editor. Applications interpret this raw data to create a file format that users can understand. A hex editor includes an address area (left column), hexadecimal area (center column), and character area (right column). The values in each column represent the interpretable contents of a file.
This file was overwritten with SecureShredder using the simple erasure method.
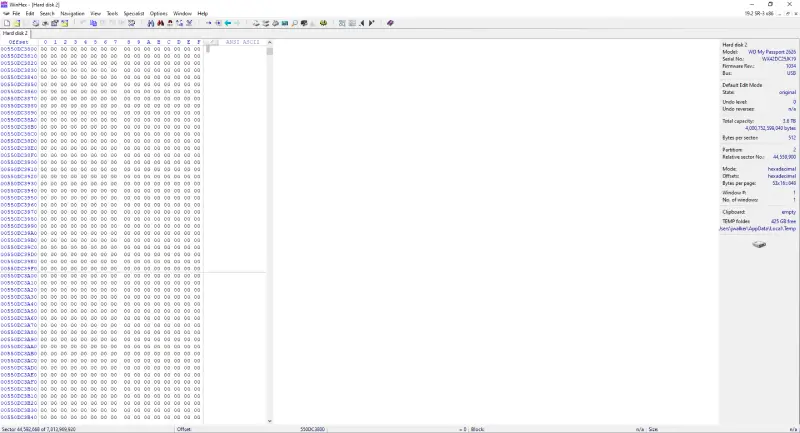
This image shows the binary data of the same file in a hex editor following erasure.
The hexadecimal area is zeroed out. The character area is blank. Applications cannot interpret the contents of a file or recreate data without these values.
The file is unrecoverable.

Timothy Burlee

Timothy Burlee is a content writer for Secure Data Recovery Services. He specializes in various topics in the data industry, including data recovery technology, storage devices, and digital forensics. Throughout his career, he has covered complex concepts and provided accessible solutions for users. Before joining Secure Data, he worked as a freelance technical writer.


