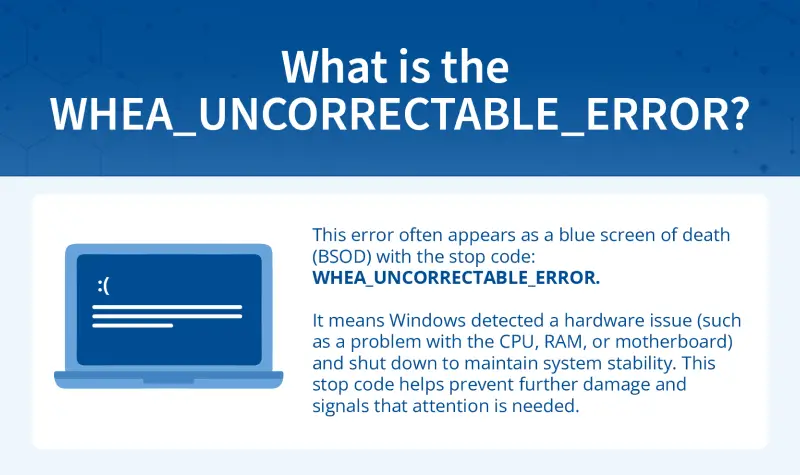
The WHEA_UNCORRECTABLE_ERROR is a specific type of blue screen of death (BSOD) that appears on Windows 10 and Windows 11 systems when the operating system detects a critical hardware issue. It’s triggered by the Windows Hardware Error Architecture (WHEA) — a built-in system that monitors for hardware problems and reports when a component, such as the CPU, GPU, RAM, or motherboard, encounters a failure it cannot recover from. While it can be unsettling to see your device crash unexpectedly, this stop code is designed to protect your system from further damage by halting operations safely.
In most cases, the underlying cause of this error is related to hardware instability. This could mean overheating, misconfigured BIOS or UEFI settings, faulty device drivers, or hardware that’s beginning to show signs of wear. However, not all causes are strictly hardware-based. The error can also stem from critical system files and firmware-level software that manage how Windows interacts with your hardware. Corruption in these layers, or conflicts introduced by recent Windows updates, firmware changes, or overclocking, can all contribute to the WHEA_UNCORRECTABLE_ERROR.
While some users are able to troubleshoot this issue successfully on their own, others may find that the error recurs or prevents normal startup. If valuable data is stored on the affected computer, it’s essential to proceed cautiously. Running stress tests or reinstalling Windows without a backup can sometimes make data recovery more difficult. That’s why it can be helpful to consult professionals who are equipped to assess both the hardware issue and the safety of your data.
If you’re experiencing this error and want to avoid unnecessary risk, Secure Data Recovery offers expert support for systems affected by hardware-related crashes. Our specialists can perform in-depth diagnostics, recover data from affected drives, and help you move forward with confidence.
Underlying causes behind the error (and what to do next)
While the WHEA_UNCORRECTABLE_ERROR may seem sudden, it’s typically the result of an underlying issue that has developed over time. These causes can range from minor software conflicts to more serious hardware failures. To help you better understand what might be happening behind the scenes, we’ve outlined the most common causes below, along with common symptoms to help you diagnose the issue.
This chart is organized by how likely each issue is to be resolved with a DIY fix, so you can prioritize steps based on what’s causing the blue screen error to occur.
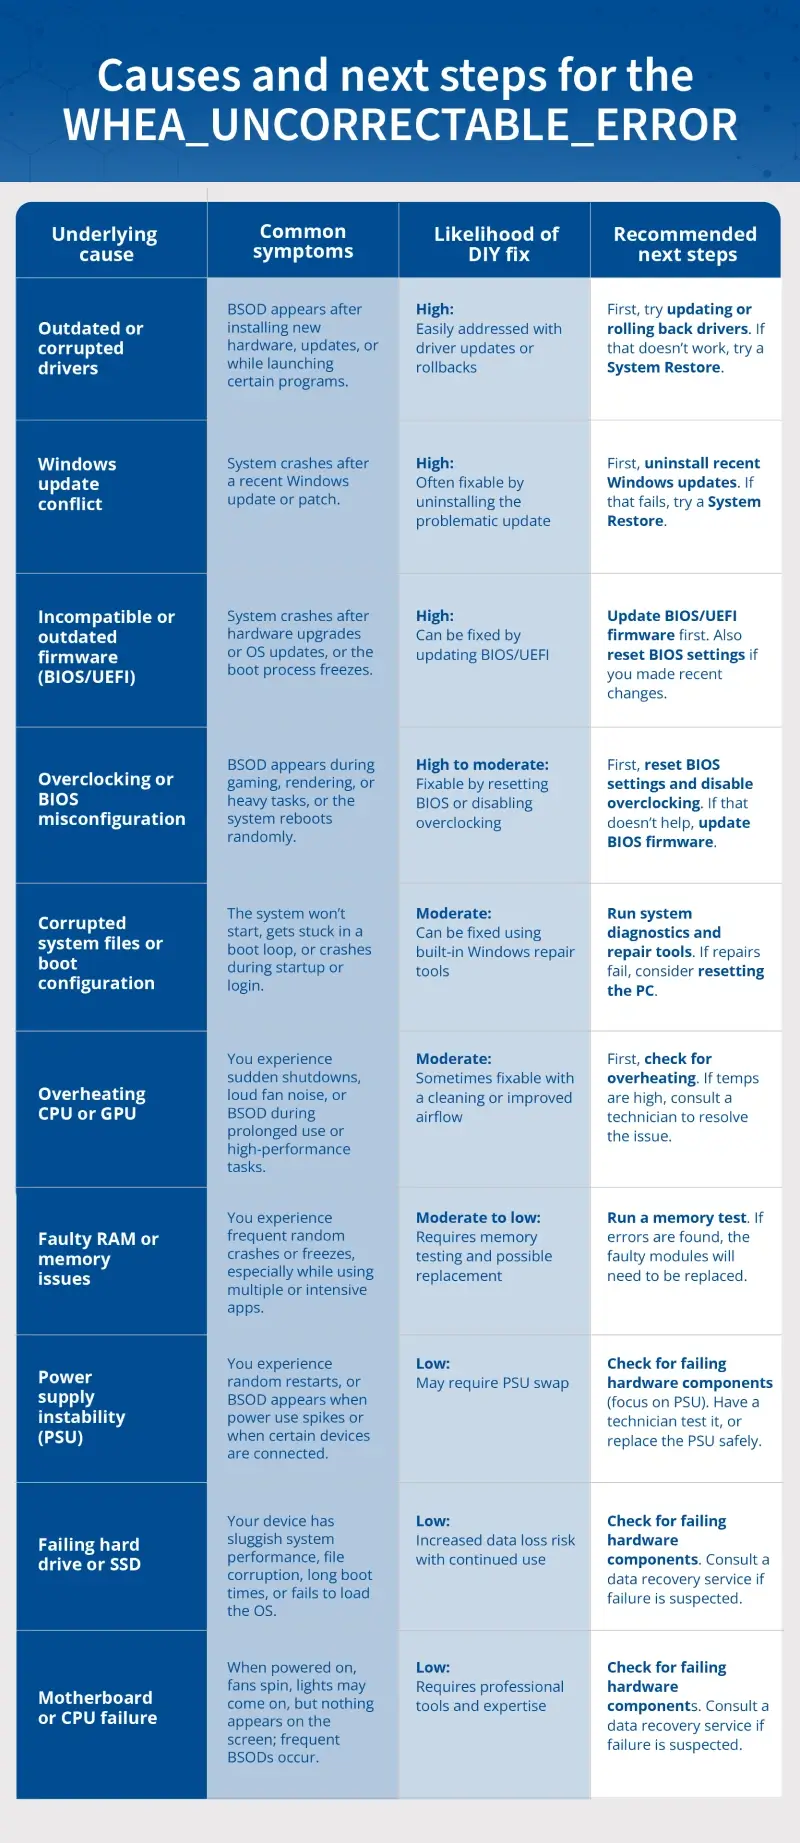
- Outdated or corrupted drivers: This issue often appears after installing new hardware or system updates and can lead to crashes during startup or while launching specific programs. Fortunately, it’s typically one of the easiest issues to resolve on your own by updating or rolling back the affected driver. If that doesn’t help, using System Restore can often undo the conflict.
- Windows update conflict: This issue often appears after installing new hardware or system updates and can lead to crashes during startup or while launching specific programs. Fortunately, it’s typically one of the easier issues to resolve on your own by updating or rolling back the affected driver. If that doesn’t help, using System Restore can often undo the conflict.
- Incompatible or outdated firmware (BIOS/UEFI): Crashes after hardware upgrades or major system updates often trace back to outdated BIOS or UEFI firmware. Updating firmware and resetting BIOS settings to default can resolve the issue, though the process should be followed carefully to avoid introducing new problems.
- Overclocking or BIOS misconfiguration: Unstable overclock settings or manual BIOS tweaks can trigger blue screens during high-load tasks like gaming or rendering. Resetting BIOS to its default settings and disabling any overclocking often resolves the issue without much difficulty, though a BIOS update may also be required.
- Corrupted system files or boot configuration: If your system fails to start or crashes shortly after login, the key system files or boot configuration data may have damage. Built-in tools like Startup Repair or System File Checker are usually effective, though a full system reset may be needed if those steps don’t work.
- Overheating CPU or GPU: Loud fan noise, sudden shutdowns, or crashes during heavy workloads may point to overheating. Improving airflow or cleaning out internal dust can help in some cases, but if temperatures remain high, the underlying issue may require professional evaluation.
- Faulty RAM or memory issues: Crashes, freezes, or glitches during multitasking can indicate bad memory modules. You can run tools like Windows Memory Diagnostic or MemTest86 to confirm the issue, but replacing RAM modules typically requires a bit of technical comfort and may be best done with expert help.
- Power supply instability (PSU): If your system randomly restarts or crashes during power-intensive tasks, the power supply may be unstable or failing. Troubleshooting this generally involves testing with a spare PSU or specialized tools, which can be difficult without access to the right equipment.
- Failing hard drive or SSD: Slow system performance, corrupted files, or boot failures often point to a drive that’s starting to fail. Because running scans or resets could worsen the issue or result in data loss, it’s safer to stop troubleshooting and consult a data recovery specialist if you suspect drive failure.
- Motherboard or CPU failure: A system that powers on but doesn’t display anything, or one that experiences frequent unexplained crashes, may be facing a failing motherboard or processor. These types of failures are difficult to diagnose and repair without professional tools and experience, and are best left to a qualified technician.
If the symptoms you’re experiencing align with one of the more common and manageable causes, such as outdated drivers or a recent Windows update, there’s a strong chance the issue can be resolved with a few guided troubleshooting steps. However, if your system is crashing unpredictably, failing to boot, or showing signs of hardware degradation, it may indicate a deeper problem that requires more caution and expertise. In either case, taking the right next step is key.
Troubleshooting steps for WHEA_UNCORRECTABLE_ERROR in Windows
If you’re seeing the WHEA_UNCORRECTABLE_ERROR, you’re essentially dealing with a very specific type of blue screen of death (BSOD). While this guide focuses on the WHEA error, you can also explore broader strategies in our article on how to fix a BSOD on a Windows PC, which covers general blue screen troubleshooting for both hardware and software-related crashes.
When you’re dealing with a WHEA_UNCORRECTABLE_ERROR, it’s important to take a methodical approach. Rushing through repairs without understanding the root problem can make things worse, especially when there’s a risk of data loss. If your system is still accessible, take a moment to back up any important files before starting any fixes. But if you can’t boot, or if you don’t have a recent backup, avoid running intensive scans or making major changes, as these actions could reduce the chances of a successful recovery.
The troubleshooting methods below are organized from the simplest to last-resort measures, starting with a vital system health check and progressing through more advanced repair options.
Method 1: Check for failing hardware components or overheating
The WHEA_UNCORRECTABLE_ERROR is commonly caused by failing hard drives, CPUs, motherboards, RAM, power supplies, or overheating. If these hardware issues are present, running repairs like CHKDSK or resetting the OS can make things worse, especially if your data hasn’t been backed up. That’s why it’s best to start with a system health check to rule out failing hardware or overheating.
Turn on your PC and observe closely:
- Do the fans spin?
- Is there a display signal?
- Are there beeps or flashing lights?
- Does the system crash or shut off without warning?
Listen for drive failure signs:
- Clicking, grinding, or buzzing from your hard drive
- Drives not detected in BIOS or boot menus
Check for overheating:
- Look out for:
- Constant or loud fans
- Very hot air from vents
- Crashes while gaming or under load
- Check temperatures:
- Enter BIOS/UEFI by pressing F2, Delete, or another key at startup.
- Look for Hardware Monitor or System Health.
- If CPU temps are over 85°C, heat may be causing the error.
Check the power supply (PSU):
- Confirm external power:
- Ensure the cable is secure and try a different wall outlet or surge protector.
- Watch for signs like flickering power, no response, or frequent crashes.
- Swap in a known-good PSU:
- If available, try a compatible power supply and reconnect only essential components.
- See if the system powers on and remains stable.
- Let a professional test it:
- If you’re unsure, have a technician safely test the PSU using proper tools.
If any hardware warning signs are present, power off the PC, avoid further repair efforts, and contact a professional immediately. Cleaning internal components or replacing parts should only be done by a technician in a cleanroom environment.
If your system appears physically healthy and you don’t hear unusual sounds, you can continue with software-based troubleshooting.
Method 2: Boot into safe mode
The WHEA_UNCORRECTABLE_ERROR can be caused by a bad driver, software conflict, or startup process. Safe Mode loads only the essential parts of Windows, making it a great way to isolate whether the issue is software-related or hardware-related. You have two ways to access Safe Mode, depending on whether you can reach your desktop or need to boot from external media.
If you can reach your desktop:
- Turn on your computer, then hold down the power button to force it off.
- Repeat this process three times. On the third restart, Windows should enter Recovery Mode.
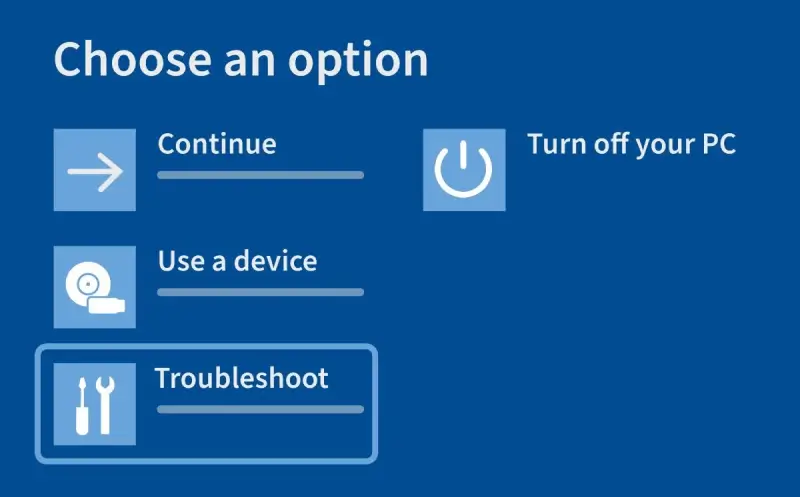
- Click Advanced Options > Startup Settings > Restart.
- Press 4 or F4 on your keyboard to choose Safe Mode.
If your system can’t load Recovery Mode:
- On a working PC, download the Windows Media Creation Tool from Microsoft
- Use it to create a bootable USB installation drive.
- Insert the USB into the affected PC and power it on.
- Press the appropriate key to access the boot menu (usually F12, ESC, or DEL).
- Choose the USB drive as your boot device.
- When the Windows installer loads, click Repair your computer > Troubleshoot > Advanced options > Startup Settings.
- Click Restart.
- On the Startup Settings screen, press F4 to boot into Safe Mode or F5 for Safe Mode with Networking.
If the system works fine in Safe Mode, the problem likely involves drivers or software. You can stay in Safe Mode to try the next methods. If the problem persists in Safe Mode, the issue is likely hardware related, in which case you should contact Secure Data Recovery for a professional diagnostic.
Method 3: Uninstall recent Windows updates
Sometimes a new Windows update introduces problems, especially if it conflicts with older drivers or BIOS settings. If the error started soon after an update, removing it can restore stability.
How to uninstall recent Windows updates:
Enter Recovery Mode using the instructions from method 2 (if you’re not already in it).
Select Troubleshoot > Advanced Options > Uninstall Updates.
First, try Uninstall the latest quality update.
If that doesn’t help, repeat and choose Uninstall the latest feature update.
Follow the on-screen steps to complete the process.
Restart your computer.
If the error goes away after uninstalling the latest updates, avoid reinstalling them until your BIOS and drivers are updated. If the issue continues, proceed to update or roll back drivers (method 4).
Method 4: Update or roll back drivers
Drivers help your operating system talk to your hardware. A bad or outdated driver, especially for your graphics card, storage controller, or motherboard, can lead to the WHEA error. Updating the driver can fix communication problems, while rolling back to an older version can help if a recent update introduced a bug.
Step 1: Use Event Viewer to identify the problematic driver:
Boot into Safe Mode (see method 2).
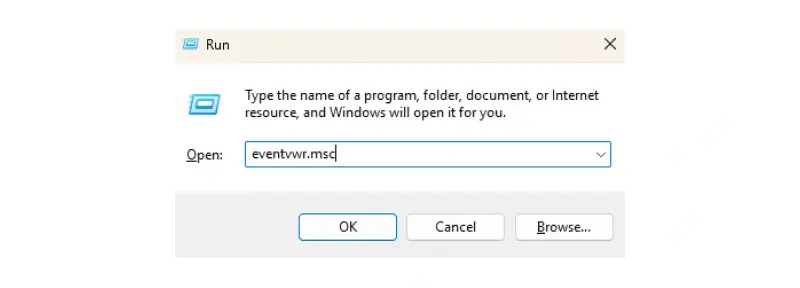
Press Windows + R, type eventvwr.msc, and press OK.
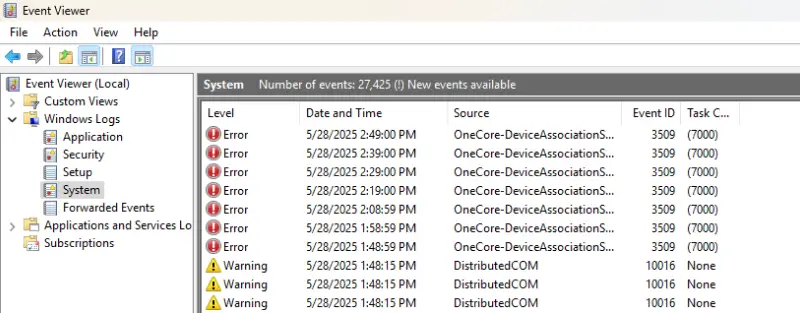
In the left panel, expand Windows Logs and click on System.
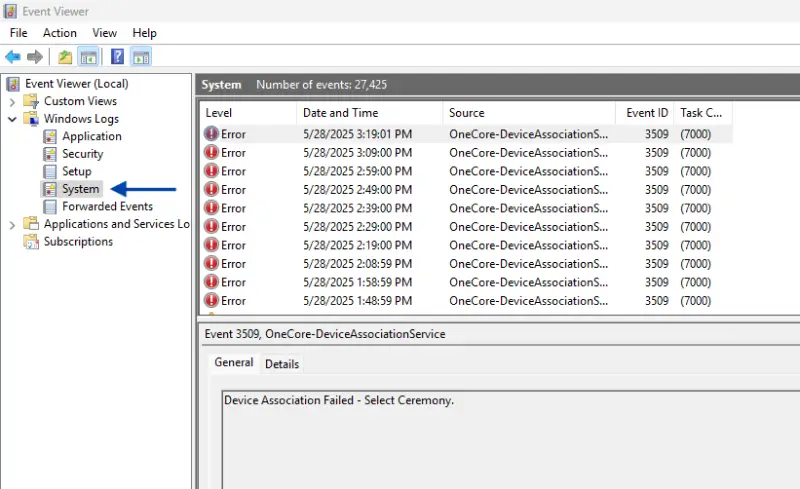
In the middle panel, look through the Error and Warning entries around the time the crash occurred.
Look for clues like:
- Specific driver file names
- Hardware references
- Repeated entries pointing to the same device or service
Jot down the associated device or driver name for the next step.
Step 2: Update or roll back the driver in Device Manager:
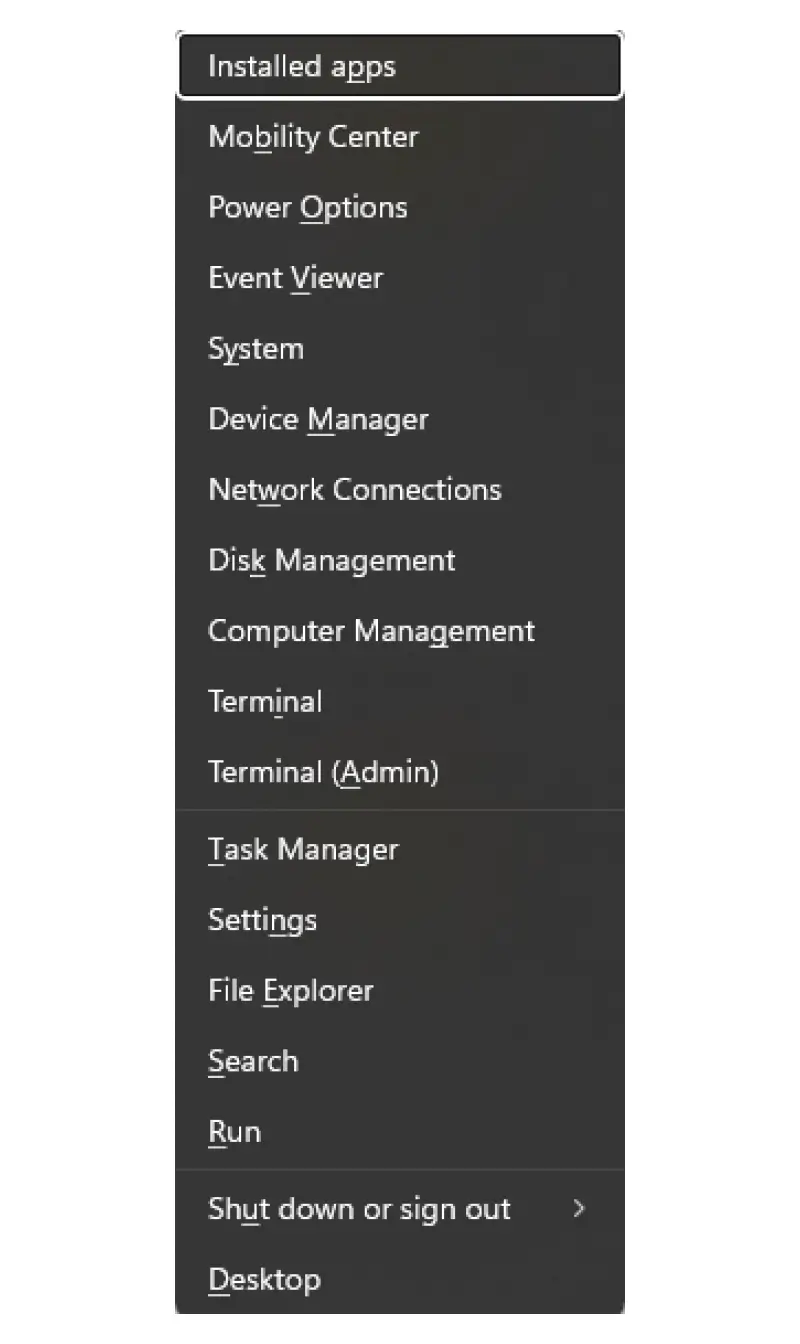
Press the Windows key + X, then choose Device Manager.
Expand the category related to the driver identified in Event Viewer (such as Display adapters, Storage controllers, System devices).
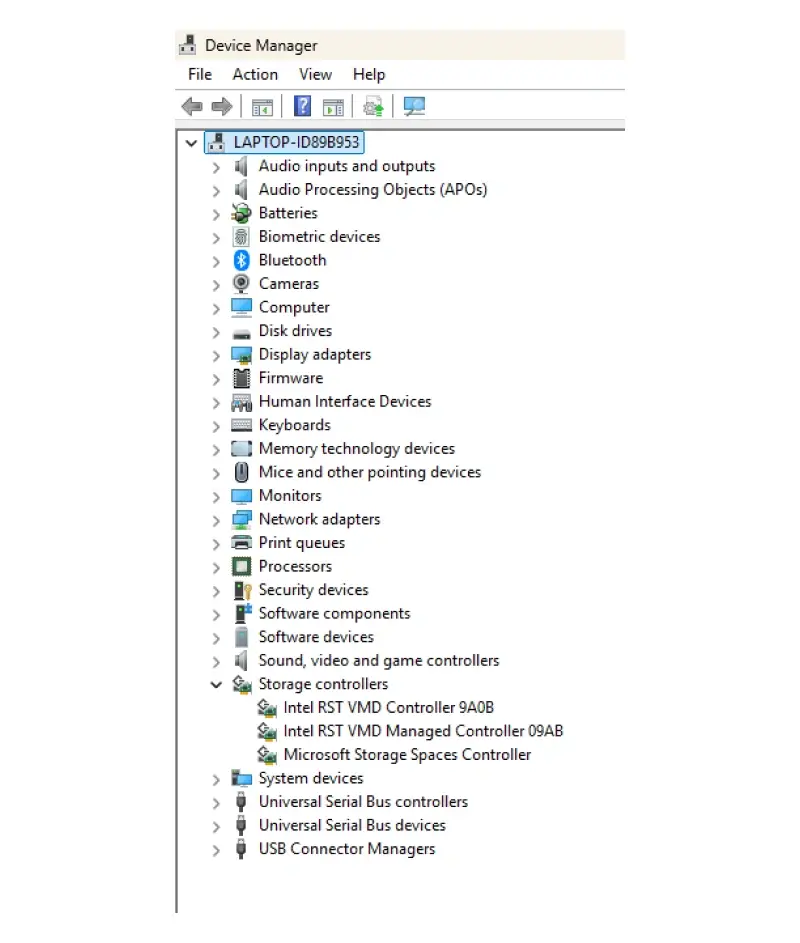
Right-click the device and use the options below accordingly.
-
To update: Choose Update driver > Search automatically for drivers.
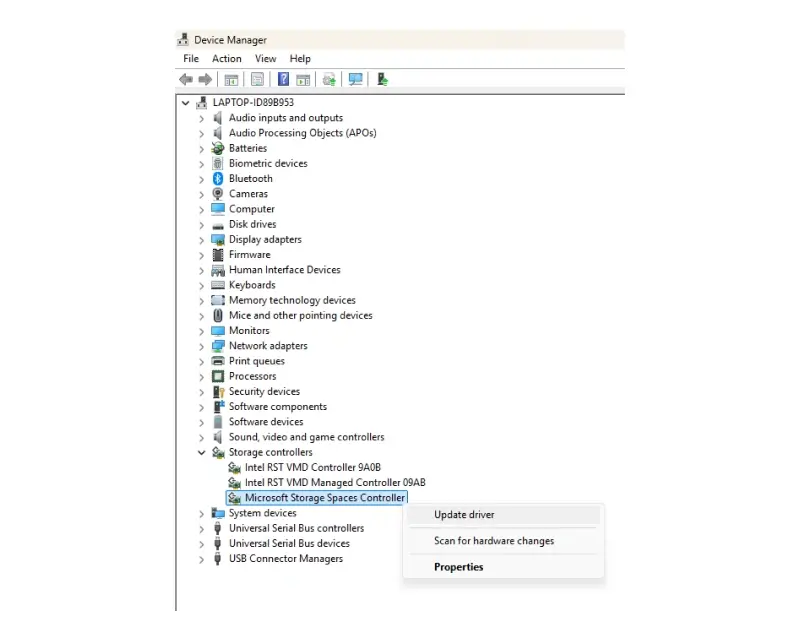

-
To roll back: Choose Properties > Driver tab > Roll Back Driver (if available).
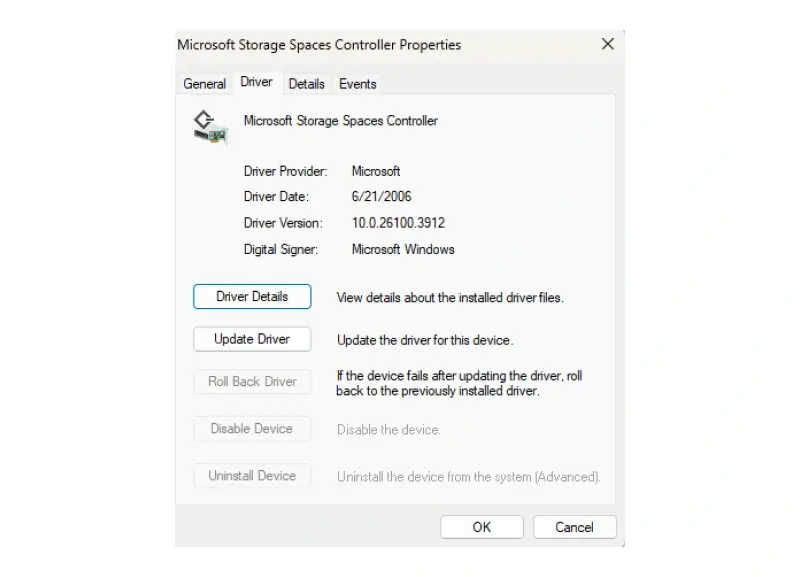
-
Restart your computer.
If your system stops crashing after this, the issue was likely driver-related. If not, the next step is to try restoring your system to a stable state (method 5).
Method 5: Use System Restore
If the WHEA error started recently, System Restore can take your computer back to an earlier time before the error began, without deleting your personal files. It can reverse bad software installs, driver updates, or system settings that may have triggered the crash.
How to perform a System Restore:
- Boot into Recovery Mode (following steps from method 2).
- Select Troubleshoot > Advanced Options > System Restore.
- Choose a restore point dated before the issue began.
- Follow the prompts to complete the restore and restart your system.
If the system starts working normally again, a recent change was the cause. If the error returns or no restore points are available, proceed to system repair tools (method 6).
Method 6: Run system diagnostics and repair tools
Corrupted system files or errors on your hard drive can cause your system to crash. Windows includes built-in repair and diagnostic tools like SFC, DISM, and CHKDSK to scan for and fix these types of problems, even if you can’t get into Windows normally.
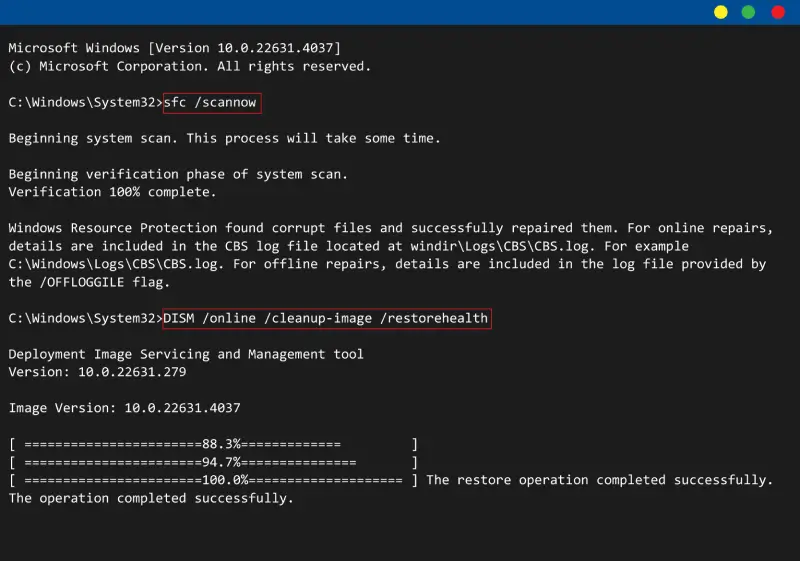
How to run system diagnostics and repair tools:
Boot into Recovery Mode (use the steps from method 1).
Select Troubleshoot > Advanced Options > Command Prompt.
Run the below commands one at a time and press Enter after each one:
sfc /scannow DISM /Online /Cleanup-Image /RestoreHealth chkdsk X: /f /r
- Replace X with your drive letter, so if your drive is C, type chkdsk C: /f /r
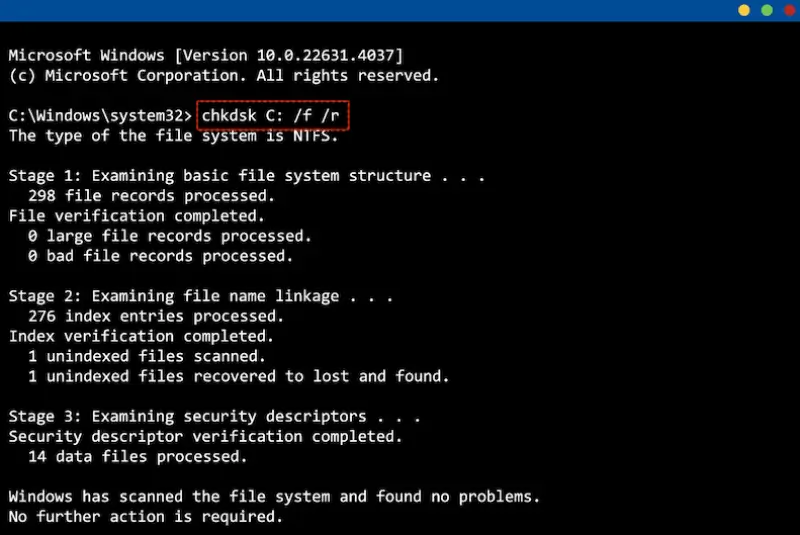
- This may take a while, depending on your drive size and condition.
- Replace X with your drive letter, so if your drive is C, type chkdsk C: /f /r
(Press Y if prompted, then restart.)
If these scans fix issues and your system becomes stable, corrupted files or disk errors were the likely cause. If you still see the BSOD error, your BIOS settings could be involved. In which case, proceed to method 7 to restore BIOS settings and disable overclocking.
Method 7: Reset BIOS settings and disable overclocking
Overclocking your CPU or memory can push your system beyond its safe limits. Many modern BIOS setups automatically enable overclocking or performance-enhancing profiles like XMP or DOCP. Resetting the BIOS and disabling these features restores factory-stable settings.
How to reset BIOS settings and disable overclocking:
- Power your computer, and then press and hold the BIOS key (typically F2, F12, Esc, or Del) before the computer completes the boot process.
- Go to the AI Tweaker, OC Tweaker, or Advanced Frequency Settings section.
- Set CPU Ratio / Multiplier to Auto or Default.
- Disable XMP, DOCP, or EXPO memory profiles.
- Set CPU Voltage, DRAM Voltage, and Base Clock (BCLK) to Auto.
- Save and exit BIOS.
If the system becomes stable, overclocking or a BIOS misconfiguration was the cause. If not, the next option is to update the BIOS firmware (method 8).
Method 8: Update BIOS/UEFI firmware
Outdated BIOS or UEFI firmware can create compatibility problems with your CPU, RAM, or newer Windows updates. Updating it can help the system run more reliably.
How to update BIOS/UEFI firmware:
- On another device, visit your motherboard manufacturer’s website.
- Download the latest BIOS update for your model (you may need to search using your PC’s serial number or model name).
- Follow the manufacturer’s instructions to place the BIOS file on a USB drive.
- Boot into BIOS on your PC and find the Update BIOS or EZ Flash tool.
- Select the file on your USB drive and follow prompts to update.
If the BIOS update works, the issue was likely firmware-related. If not, test your system memory next (method 9).
Method 9: Test memory (RAM)
Bad RAM can cause all kinds of system instability, including WHEA errors. Memory tests can detect issues that might otherwise go unnoticed.
How to do it with Windows Memory Diagnostic:
From Safe Mode or Recovery Mode, press Windows + R to open the Run box.
Type mdsched.exe and press OK.
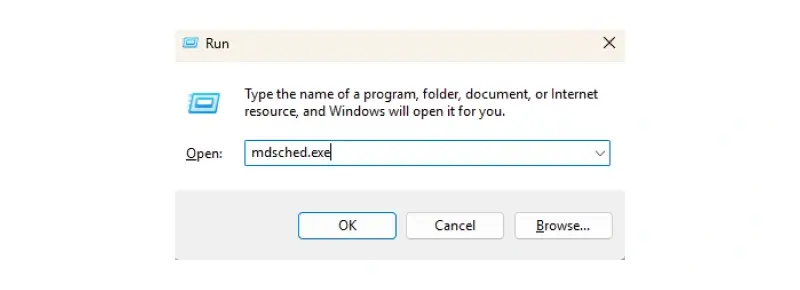
Choose Restart now and check for problems.
The system will reboot and automatically test memory.
After restarting again, review the results or check Event Viewer under System logs.
How to do it with MemTest86:
- On another computer, download MemTest86 from memtest86.com.
- Use their tool to create a bootable USB drive.
- Insert the USB into your affected PC and boot from it (you may need to press F12 or change the boot order in BIOS).
- Let the test run for two to four full passes.
If errors are found, you’ll need to replace the faulty RAM. If no errors appear, proceed to the final option: resetting Windows (method 10).
Method 10: Reset this PC (last resort)
If all else fails and your data is backed up or recovered, a full system reset reinstalls Windows and removes corrupted settings or files. It’s only appropriate when you’ve ruled out hardware failure and other software fixes.
Note: This process can overwrite files and make future data recovery harder. Only use it if you’re certain your files are no longer at risk.
How to reset your PC:
- Boot into Recovery Mode (using instructions from method 2).
- Choose Repair your computer > Troubleshoot > Reset this PC.
- Select Keep my files when prompted to preserve personal data.
- Choose Remove everything only if your system is backed up or empty.
- Follow the prompts to complete the reset.
If the reset succeeds, the issue was likely OS corruption. If it fails, hardware failure is likely, and professional repair is recommended.
Next steps if your system still won’t recover
If you’ve worked through every troubleshooting method and your system still shows a BSOD with the WHEA_UNCORRECTABLE_ERROR message, it’s time to pause and protect what matters most: your data. The error can be difficult to resolve when the underlying cause is physical hardware failure, severe firmware corruption, or unrecoverable system damage. Continuing to run scans or resets at this point could make things worse, particularly if a failing hard drive or SSD is involved. So before taking any further action, here’s what you should consider doing next.
1. Stop further repair attempts
Even well-intentioned fixes can cause permanent data loss when the problem is hardware-based. If your system shows any signs of deeper physical problems, continuing to troubleshoot may do more harm than good.
If your system is:
- Making clicking or grinding sounds...
- Crashing even during Safe Mode or recovery tools...
- Failing to detect your hard drive...
- Powering on with no display or system response...
... it’s time to stop all DIY repairs and avoid running intensive tools like CHKDSK or PC resets. These processes can overwrite or further damage data stored on a failing device, making recovery much more difficult. In these cases, working with a trusted hard drive recovery provider is often the safest way to protect and retrieve your files.
2. Let the professionals take over
When the issue goes beyond what can be safely fixed at home, this is where Secure Data Recovery can make all the difference.
We specialize in recovering data from systems affected by:
- Drive failure
- Motherboard and CPU damage
- Power supply issues
- Corrupted or inaccessible operating systems
Our engineers operate in certified cleanroom environments, ensuring that your hardware is handled with the highest level of safety and precision. Whether your drive is completely unresponsive or your files were lost during failed repairs, we have the tools and experience to recover data that others can’t.
We also provide:
- A strict “no data, no recovery fee” guarantee
- Support for all operating systems, devices, and configurations
- Industry-leading success rates backed by years of specialized experience
If your data is important and previous troubleshooting hasn’t resolved the issue, don’t wait until the damage becomes irreversible. Shut down your system and contact Secure Data Recovery to begin the evaluation process.
You can:
- Start a case online here.
- Call our 24/7 support line at 800-388-1266.
- Visit one of our local drop-off locations nationwide.
The sooner we can assess your system, the better your chances of a full recovery.
Handling the WHEA_UNCORRECTABLE_ERROR with confidence and care
The WHEA_UNCORRECTABLE_ERROR can be one of the more difficult Blue Screen errors to troubleshoot — especially when the underlying cause isn’t immediately clear. Often rooted in hardware-level issues like unstable drivers, outdated firmware, or aging components, this stop code requires more than just surface-level fixes. And while many cases can be resolved with thoughtful, step-by-step troubleshooting, others require a more careful approach.
If you’ve worked through the common solutions and the error persists, or if your system is showing signs of hardware trouble, it may be time to bring in professional support, especially when your data is at risk.
Secure Data Recovery provides expert diagnostics and recovery services for systems affected by hardware failure, data loss, and complex error codes. With industry-leading tools, certified cleanroom facilities, and a no-data, no-fee guarantee, we’re here to help when repairs alone aren’t enough. Start your evaluation today and take the next step toward recovering your system and protecting what matters most.

Yevgeniy Reznik

Yevgeniy Reznik is Laboratory Operations Manager at Secure Data Recovery Services in Cleveland, Ohio, and has more than a decade of experience as a data recovery engineer. He graduated from Cleveland State University with a degree in computer science and spent 15 years as an IT entrepreneur and small business owner before joining the company.