Despite the myriad of advantages of external drives, they are not exempt from errors. These errors can arise from various causes, such as electrical failures, virus attacks, physical damage, corruption in the file system, or even accidental deletion of data. Such problems disrupt access to data and signal potential failure of the drive. Particularly for Samsung drives, recognizing the signs of failure is crucial. Correct diagnosis and taking immediate action can significantly enhance the likelihood of complete data recovery and keep the integrity of the data intact.
Understanding Samsung Errors
Understanding the intricacies of Samsung drive errors transcends mere quick fixes. It involves deeply comprehending the fundamental interplay between data and the Samsung hardware it resides on. This knowledge is integral not only for resolving errors but also for preventing unexpected data loss. Secure Data Recovery, the authority in RAID, SSD, and hard drive recovery, provides valuable insights into the nature of these errors and how to fix them.
How to Perform A Samsung Drive Health Check
Maintaining the health and performance of Samsung external drives is important for ensuring data integrity, optimizing performance, and extending the device's lifespan. These checks encompass hardware and software aspects, focusing on key elements such as partitions, file systems, and the drive's overall condition. Implementing these diagnostic methods is essential to maintaining the reliability and efficiency of Samsung drives in data storage and access.
Use Samsung Magician Software
Samsung provides powerful software tools for performing health checks, notably the Samsung Magician Software. This comprehensive solution supports a wide range of Samsung memory products and is compatible with multiple operating systems, including Windows, macOS, and Android.
Key Features of Samsung Magician Software:
- Drive Information & Health Check
- Offers a quick overview of the drive’s health, temperature, and performance.
- Provides real-time data, accessible anytime and anywhere.
- Genuine Authentication
- Verifies the authenticity of Samsung memory products, unlocking their full performance.
- S.M.A.R.T. Check
- Monitors the health of your SSD and anticipates potential failures.
- Performance Benchmark & Optimization
- Customizable tests to measure and optimize drive performance.
- Adjustments for power efficiency and performance based on user needs.
- Diagnostic Scan & Over Provisioning
- Instant tests for enhancing drive functionality and maintenance.
- Data Management Tools
- Features like data migration, secure rase, and PSID Revert are for comprehensive data management.
Using Command Prompt on Windows
Using the Command Prompt on Windows offers a straightforward method to assess the health of your SSD. Utilizing WMIC (Windows Management Instrumentation Command-line), you can quickly determine the status of your drive. WMIC leverages SMART (Self-Monitoring, Analysis, and Reporting Technology). This feature is specifically designed to provide a snapshot of your drive's condition, outputting simple statuses like "OK" or "Pred Fail" to indicate the drive's health.
- Press the Windows + R buttons together to open a run command window.
- Type cmd, then hit the Enter key.
- Right-click the command prompt display, then choose Run as administrator.
- Type wmic in the command prompt window, then press Enter.
- Type diskdrive get status, then press Enter.
- The command diskdrive get status will display 'OK' for a healthy drive or 'Pred Fail' for potential issues.
Note: This command assesses the health of your Samsung SSD. For more comprehensive information, you should use a third-party application.
Using the System Information App on macOS to Check S.M.A.R.T. Status
The System Information utility is a useful tool for diagnosing and repairing drive issues, including checking the S.M.A.R.T. status on macOS.
You can launch the System Information Utility from the Applications/ Utilities folder or by holding down cmd + spacebar and searching for “System Information.”

Once opened, select “storage” from the left navigation panel.
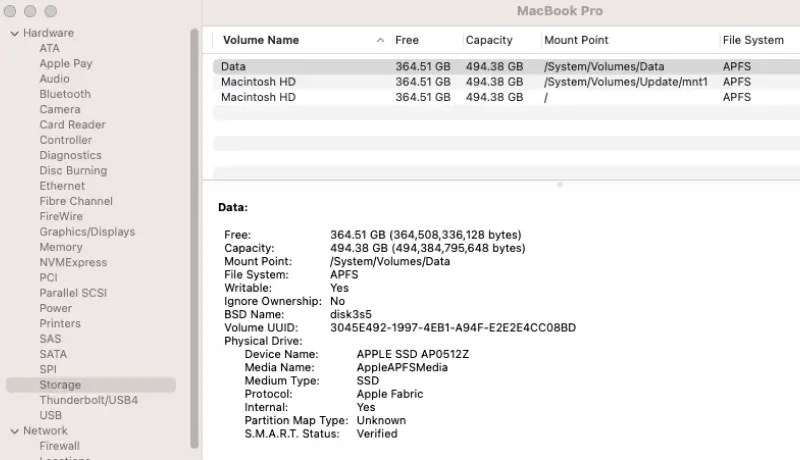
Here you will see an overview of all connected drives and their information, including the S.M.A.R.T. status, which indicates the drive's health:
- Verified: This status means the drive is functioning properly.
- Failing: Indicates a critical issue, suggesting the drive may need immediate replacement.
Use First Aid on macOS
To check and repair your SSD, open the Disk Utility app, select your drive and use the First Aid feature. This process is similar to the chkdsk utility in Windows. It scans the drive, reports any errors, and offers repair options. If no issues are found, Disk Utility will display a message confirming the successful operation or verification of the disk.
Note: Before running First Aid, backup your data. Running the Repair Disk option might render some data inaccessible if it encounters bad sectors.
First, confirm the drive’s visibility in Disk Utility. The following path opens Disk Utility: Go > Utilities > Disk Utility. A list of drives should be displayed. Click on the Samsung drive to view its details. If the drive is visible but not mounted, you can repair it using First Aid:
- Select the highlighted drive.
- Navigate to the First Aidv tab.
- Click Verify Disk. If prompted, run Repair Disk.
Common Samsung Errors And Tips on How to Fix Them
Despite their highly reliable, durable, and long-lasting design, Samsung SSDs are still susceptible to issues that could jeopardize your data, often at the worst times. Understanding and effectively addressing common drive errors are key to preserving the device's integrity and ensuring uninterrupted access to data.
This section aims to thoroughly describe these common errors, delving into their causes and presenting suitable fixes to minimize data loss and extend the drive's lifespan. This focus will empower users with the knowledge to maintain the health and reliability of their Samsung drives.
Request Failed Due to a Fatal Device Hardware Error
This error typically occurs when the operating system is unable to access the Samsung drive or perform read/write operations. It often indicates a severe issue with the drive, e.g., X: is not accessible, or the request failed due to a fatal device hardware error.
Causes of the error:
- Faulty or loose USB cable connections.
- Presence of too many bad sectors on the disk.
- System or hardware faults.
- The drive is nearing the end of its lifespan.
Steps to fix this error:
- Check drive connection:
- Ensure cable connections are secure.
- Try a different USB port or a new cable.
- Test the drive on another computer.
- Verify SMART Status: Use Samsung Magician to check the SMART status of the drive for any warning signs.
- Check and repair Bad Sectors: Use the Windows DiskPart utility or CHKDSK to identify and repair bad sectors. Be aware that running CHKDSK can lead to data loss, so back up data beforehand.
- Update storage device disk driver: Outdated drivers can cause issues. Update the device’s drivers through Device Manager in Windows.
- Seek professional drive repair services: If self-troubleshooting does not resolve the issue, consider consulting with professional data recovery and SSD repair services.
Preventive measures:
- Regularly check the health of the drive using diagnostic tools.
- Keep your system’s drivers and firmware updated.
- Ensure a stable and secure connection for external drives.
RAID Failure Error

This error occurs with Samsung drives operating within a RAID array. A RAID is a setup combining multiple drives for redundancy or performance enhancement.
Causes of the error:
- Mechanical damage in SSD components.
- Logical errors or misconfigurations within the RAID setup.
- Electrical issues or firmware inconsistencies.
Steps to fix the error:
- Identify the faulty drive: Use RAID management tools to locate the malfunctioning drive, which is often indicated by unusual sounds like clicking or grinding.
- Replace and rebuild: Replace the identified faulty drive with a new, compatible one. Then, Initiate the RAID array's automatic rebuilding process, monitoring through the RAID management software.
- Firmware and software updates: Post-rebuild, check for and apply any available updates for the RAID controller and drives.
- RAID Configuration Verification: After updating and rebuilding, validate the RAID setup and data integrity, ensuring all files are accessible and uncorrupted.
- Complete diagnostic check: Conduct a comprehensive diagnostic of the entire RAID array to confirm the functionality of all drives and preempt future failures.
In cases of severe mechanical damage, seeking professional data recovery services is advisable. In RAID configurations, ensuring regular backups is critical to safeguarding against data loss.
Not Formatted/ Won't Format Error
This error typically occurs when the system recognizes a Samsung drive as 'RAW' instead of its usual file system format. This leads Windows to prompt for formatting.
Causes of the error:
- File system corruption due to improper ejection, power issues, or malware.
- Physical damage to the drive.
- Issues with drive recognition by the operating system.
Steps to fix the error:
-
Formatting the drive: After ensuring your important data is backed up, proceed to format the drive by right-clicking on the drive in File Explorer and selecting Format:
- Choose the file system you prefer (NTFS for Windows, exFAT for cross-platform compatibility, etc.) and check the Quick Format option.
- Click Start to begin the format process.
-
Troubleshooting format failures: If the drive refuses to format:
- Open Disk Management by right-clicking on This PC > Manage > Disk Management. Right-click on the drive and try formatting from there.
Use the Windows DiskPart tool for a more in-depth formatting process:
- Open Command Prompt as an administrator, type diskpart and list the volumes with list volume.
- Identify your drive, select it with select volume [number], and use 'format fs=ntfs quick' (or 'format fs=fat32 quick').
- Addressing system and driver issues: Ensure that your system drivers, especially those related to storage, are up to date. Go to Device Manager, find your drive under Disk drives, right-click, and select Update driver.
- Run System File Checker to repair potentially corrupted system files which might be causing the issue. Open Command Prompt as an administrator and run 'sfc /scannow'.
-
Using CHKDSK Utility: If the system still recognizes the drive but refuses to format, you might have to use CHKDSK. Run Command Prompt as an administrator and type 'chkdsk [drive letter]: /f'.
Note: This can result in data loss, so it should be done after ensuring that your data is safe.
-
Creating a New Volume: If none of the above methods work, delete the existing partition and create a new one:
- In Disk Management, right-click on the drive and choose Delete Volume.
- Then, right-click on the unallocated space and select New Simple Volume. Follow the wizard to create and format the new partition.
If the drive consistently fails to format or exhibits physical signs of damage (like unusual noises). This may indicate a more serious hardware issue that warrants a professional evaluation. Always prioritize data recovery before attempting fixes that might risk data integrity.
Unusual Noise Error in Samsung Drive
This error is characterized by sounds such as ticking, clicking, buzzing, screeching, grinding, clacking, or beeping, indicating potential mechanical or power-related issues. These noises can vary in their cause and severity, and they often signal physical problems within the drive.
Causes of the error:
- Mechanical malfunctions
- Dust and debris in the drive's ports or connectors.
- Power supply issues leading to insufficient power to the drive.
- Physical damage due to dropping or mishandling.
Steps to fix the error:
- Clean connections: Ensure the connections are free of dust. Blow out dust from the drive's ports and cables using canned air.
- Cable and port check: Try using a different USB cable, as faulty cables can lead to these issues. Connect the drive to a different USB port to rule out port-related problems.
- Power supply solutions: If a power shortage causes the issue, use a USB Y-cable or connect the drive to a powered USB hub. This can ensure the drive receives adequate power.
- Testing on different systems: Connect the drive to a different computer to determine if the issue is with the original computer or the drive itself.
- Running CHKDSK Utility: Use the CHKDSK utility in Windows to check for and fix bad sectors or file system errors. Open Command Prompt as an administrator and type chkdsk X: /r (replace X with your drive's letter).
The specific pattern and frequency of the noises can offer clues about the nature of the problem. For example, continuous beeping might indicate power issues, while periodic beeping could suggest mechanical failures. If troubleshooting does not resolve the problem, professional data recovery services might be required for severe mechanical issues.
Cannot Open Samsung Drive Error
This error occurs when the computer recognizes a Samsung external drive but remains inaccessible, showing various error prompts like "The disk in drive X: is not formatted" or "The drive X: is not accessible."
Causes of the error:
- File system corruption or incompatibility.
- Physical damage or connection issues.
- Driver problems or outdated firmware.
Steps to fix the error:
- Change connection method: Use a different USB cable or port. Check the power adapter if applicable. Or, you can try to connect the drive to a different computer to rule out system-specific issues.
- Driver and disk management solutions: Update the SSD’s driver through Device Manager. In Disk Management, assign a new drive letter or initialize the disk if it shows as unallocated.
- Format the drive: If the drive is recognized but can’t be accessed, formatting might be necessary. Right-click the drive in Disk Management and choose 'Format'. Remember, this will erase all data on the disk.
- Create a new volume or initialize:
- If the SSD shows as unallocated, create a new volume in Disk Management.
- If the drive is not initialized, use the Disk Management tool to initialize the SSD.
In cases where the drive is physically damaged or these steps don’t resolve the issue, professional data recovery services may be needed. Always ensure data backup before attempting format or partition changes to prevent data loss.
Virus Error on Samsung SSD
This error occurs when a virus infects a Samsung drive, potentially leading to data corruption or loss. Due to their portability and frequent connection to various systems, external drives are particularly susceptible to virus attacks.
Causes of the error:
- Connecting the drive to infected systems.
- Downloading and storing infected files.
- Lack of proper antivirus protection.
Steps to fix the error:
- Using Command Prompt (CMD):
- Connect the external drive to your computer.
- Open CMD: go to Start, type "cmd", right-click on "cmd.exe", and select "Run as administrator".
- Use the command attrib -h -r -s /s /d [drive letter]:\*.* (replace [drive letter] with the actual letter assigned to your drive).
- This command attempts to repair the infected drive and remove the virus.
- Professional virus removal service: If you're not comfortable using CMD or if CMD doesn't resolve the issue, consider using a professional virus removal service. This ensures a safe and secure way to remove the virus without risking data loss.
Always back up important data regularly to prevent loss in case of virus attacks.
Note: Be cautious of the limitations and risks of using CMD for virus removal, as incorrect use can lead to data loss.
Not Showing Up in BIOS Error
This error occurs when a Samsung SSD is not detected in the BIOS. It can happen for various reasons and prevents the SSD from being recognized during system startup.
Causes of the error:
- Outdated BIOS is not supporting the SSD.
- Improper connection of the SSD to the computer.
- Faulty or incompatible SATA port.
- Incorrect BIOS configuration settings.
Steps to fix the error:
- BIOS update: Updating the BIOS can resolve compatibility issues with the SSD. During this process, ensure a stable power supply to prevent motherboard damage.
- Check and reconnect SSD: Disconnect the power supply and open the computer case. Check the SSD connections and reconnect them to ensure a proper connection.
- Try a different SATA Port: Connect the SSD to a different SATA port on the motherboard, as some ports may malfunction or have a bad connection.
- Configure BIOS settings:
- Restart the computer and enter the BIOS setup.
- Adjust the SATA Controller settings and ensure the SSD is recognized.
- Save changes and restart to check if the SSD is detected.
If these steps do not resolve the issue, it may indicate a more serious hardware problem. In such cases, professional assistance may be necessary. Always back up important data as a precaution against potential data loss during troubleshooting.
S.M.A.R.T. Error
S.M.A.R.T. (Self-Monitoring, Analysis, and Reporting Technology) errors in Samsung SSDs indicate potential impending drive failure. The BIOS detects these errors, and despite appearing functional, a S.M.A.R.T. error is a warning of potential future failures.
Causes of the error:
- Excessive read retries or bad sectors.
- Slow drive spin-up time.
- Overheating of the external drive.
- Incompatibilities or misconfigurations in BIOS settings.
Steps to fix the error:
- Improving ventilation: Check the system’s ventilation and ensure all fans are working properly to address overheating issues.
- BIOS update and configuration: Update the BIOS to the latest version that supports the specific Samsung SSD model. Then, adjust BIOS settings to ensure proper recognition and operation of the SSD.
- Use Disk Repair Utilities: Utilize Windows Disk Check or other disk repair tools to scan and fix errors, bad sectors, or file system issues on the SSD.
- Use Samsung Magician: Open the program, go to Drive Details, select your drive, and click the S.M.A.R.T. button. If any of the tests show anything other than OK in the Status column, your drive is close to failing. While using Samsung Magician, some models of SSD can also run a Diagnostic Scan for more information.
If the S.M.A.R.T. error persists after taking these steps, and the drive is still under warranty, consider replacing the drive. In cases where the BIOS cannot interpret the S.M.A.R.T. data correctly, consult with the computer or motherboard manufacturer for further guidance or potential BIOS disabling of S.M.A.R.T. tests.
Samsung Data Recovery
Dealing with a failed Samsung SSD, especially when critical data is involved, often necessitates professional data recovery intervention. While software solutions can effectively address logical issues, they are ineffective in cases of physical damage or mechanical failures.
In such circumstances, Secure Data Recovery can help. Specializing in Samsung data recovery, they offer services such as emergency recovery, free diagnostics, and a "No Data, No Recovery Fee" policy. Since 2007, their skilled engineers have developed a deep understanding of various Samsung device failures.
Call us at 800-388-1266 and speak to a specialist today for immediate assistance and to initiate the recovery process.